
Quick Summary: Cleaning mini-split coils is easy! Shut off the power, gently remove the filter, spray the evaporator coils with specialized cleaner, let it sit, and rinse with distilled water to restore cool air flow and save energy.
How To Clean Mini Split Coils: Amazing Results
Is your mini-split blowing weak air? Are your energy bills creeping up higher than usual? You are not alone. Many folks feel confused when their efficient mini-split starts struggling. These systems are great, but they need a little love now and then.
Don’t worry about complicated manuals or needing a technician for basic upkeep. I’m Jack from ACReviewHub.com, and I’m here to make this super simple. We will walk through cleaning those crucial indoor coils step-by-step. By the end, you’ll have the confidence to keep your system running like new.
Why Cleaning Mini Split Coils Really Matters
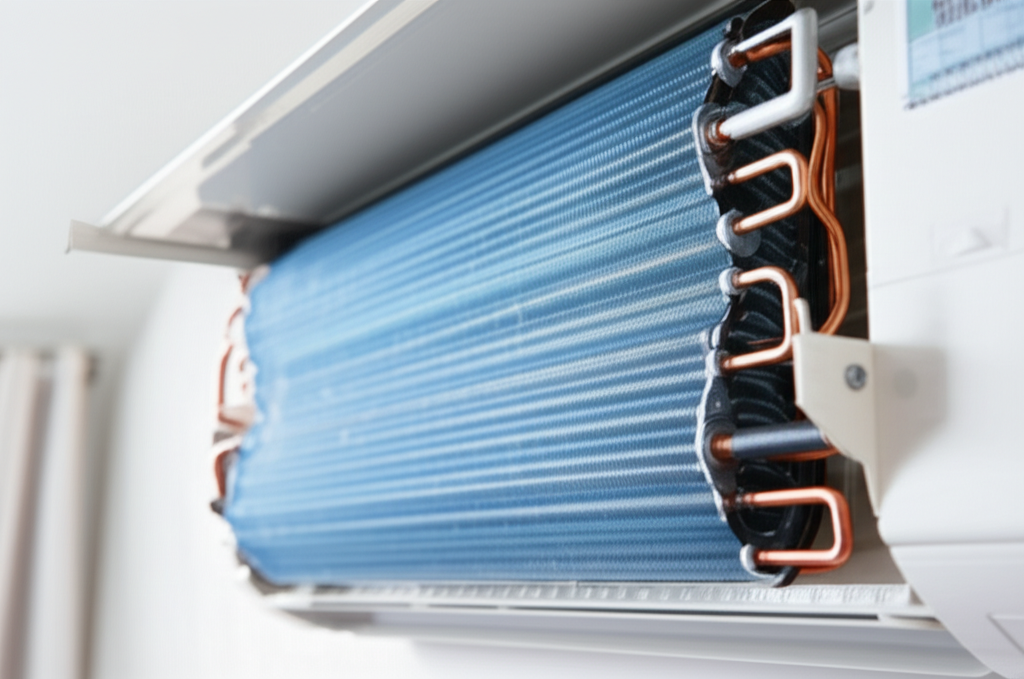
The indoor unit of your mini-split has coils, called the evaporator coils. Think of them as the main part that actually cools your air.
When these coils get dusty or grimy, it’s like putting a thick blanket over them. The dirt blocks the cold air from moving out into your room effectively.
This dirt buildup causes three big problems we all want to avoid:
- Less Cooling: Your room won’t get as cold, even when the AC runs constantly.
- Higher Bills: The system works much harder, sucking down more electricity.
- Bad Smells: Dirt and moisture can lead to musty odors blowing through your home.
Gathering Your Simple Cleaning Supplies
You don’t need a truckload of fancy tools for this job. Most of what you need is easily found at your local hardware store. Preparation is half the battle!
Here is your essential checklist before we start:
- Safety First: Turn off the power to the unit at the breaker box.
- Cleaning Solution: Use a dedicated no-rinse or mild coil cleaner made for HVAC systems. (Dish soap mixed with water is okay for very light cleaning, but specialized cleaner works best.)
- Soft Brushes: A soft-bristled toothbrush or a specialized coil brush for gentle scrubbing.
- Water Source: A spray bottle filled with clean, distilled water (tap water is fine if you don’t have distilled).
- Catching Drips: Plastic sheeting, old towels, or a shallow pan to catch drips underneath the unit.
- Protection: Safety glasses are always a good idea when spraying things near your face.
Step-by-Step Guide to Cleaning Your Indoor Coils
This is where we roll up our sleeves. Remember, be gentle! Those thin metal fins on the coils bend very easily.
Step 1: Power Down Completely
Go to your main electrical panel (the breaker box). Find the breaker labeled for your mini-split system and flip it to the OFF position. Double-check that the indoor unit is totally dead before touching anything.
Step 2: Accessing the Coils (Filter Removal)
Carefully lift the front cover or door of the indoor unit. It usually hinges open easily. Locate the mesh air filters—these are the easiest parts. Slide or unclip the filters out and set them aside. You should now see the metal fins of the evaporator coil behind where the filters sat.
Step 3: Protect Your Walls and Floor
This is the messy part! Drape your plastic sheeting or towels underneath the unit and against the wall. Position your shallow pan directly under the lowest part of the coil to catch runoff.
Step 4: Apply the Coil Cleaner
Spray your approved coil cleaner evenly over the entire surface of the evaporator coil. Make sure you get between the fins. Follow the directions on your cleaner bottle regarding how long to let it sit—usually 5 to 10 minutes. This dwell time lets the cleaner break down the dirt and grime.
Step 5: Gentle Scrubbing (If Needed)
If the coils look really dirty, gently use your soft brush or toothbrush to lightly agitate the dirt on the surface. Brush in the direction of the fins (up and down), never side-to-side, to avoid bending them. For most regular cleanings, you can skip this step.
Step 6: Rinsing the Coils
Using your spray bottle of clean water, lightly mist the coils. You are trying to rinse the cleaner and the loosened dirt down into your catch pan. Do not blast the coil with a high-pressure hose, as this can damage the fins and push water into the electronics.
Step 7: Finishing Up and Drying
Let the coils drip dry for about 15 to 20 minutes. Make sure the unit is free of excess moisture. Clean up your protective plastic and dispose of the dirty water. Reinstall the clean filters, close the cover, and restore power at the breaker.
When to Call a Professional vs. DIY Cleaning
Knowing your limits keeps you safe and saves you money. Here’s a quick guide on what you can handle versus when you need an expert HVAC technician.
| Task | Best For Beginners (DIY) | When to Call a Pro |
|---|---|---|
| Filter Cleaning | Yes, monthly. | N/A |
| Evaporator Coil Surface Cleaning | Yes, annually with spray cleaner. | If deep sludge buildup requires power washing or disassembly. |
| Condenser Coil (Outdoor Unit) Cleaning | Yes, gently hose down the outside fins. | If the unit is severely clogged with debris or refrigerant issues are suspected. |
| Checking Refrigerant Levels | No, never attempt this. | Always—this requires special tools and certification. |
Maintenance Schedule for Maximum Efficiency
Consistency is key to keeping your mini-split running perfectly year after year. Think of this as routine car maintenance, but much easier!
Here is a simple routine to follow:
- Monthly: Clean or rinse the removable mesh filters. This is the most important step for airflow!
- Twice Per Year (Spring/Fall): Perform the deep coil cleaning we just discussed on the indoor unit.
- Annually: Gently clean the outdoor condenser unit fins (make sure the power is off!).
- Every 3 Years: Schedule a full professional tune-up to check electrical connections and refrigerant levels.
For more in-depth information on keeping your home energy efficient, check out helpful resources like the U.S. Department of Energy’s guide on heating and cooling.
Frequently Asked Questions (FAQ)
Got a few more lingering questions? No sweat, I’ve got quick answers right here.
Q: Can I use bleach or strong chemicals on the coils?
A: No way! Bleach and harsh chemicals can severely corrode those delicate aluminum fins and damage the unit. Stick to approved coil cleaners.
Q: How often do I really need to clean the coils?
A: If you use the AC heavily (like every day in summer), clean them once a year. If you only use it occasionally, every 18 months is fine, but always clean the filters monthly!
Q: My fins are slightly bent. Is this a big deal?
A: A few slightly bent fins are usually okay. If you have a large patch bent over, you might notice slightly reduced performance, but it’s often not worth the risk of trying to fix it yourself unless you have a special fin comb.
Q: My AC still smells musty after cleaning the coils. What now?
A: This often means mold or mildew is growing deeper inside the drain pan or blower wheel. This requires a more intensive “deep clean” service usually performed by a professional.
Q: Do I have to turn off the breaker, or is just using the remote control okay?
A: Always turn off the breaker! Even when the unit seems off via the remote, low voltage electricity is still present, and you don’t want to risk a short circuit while working inside the housing.
Wrapping Up Your Coil Cleaning Project
See? That wasn’t so scary after all. Cleaning your mini-split coils is a straightforward task that pays you back instantly with better cooling and lower electric bills. You took control of your comfort today!
Keep up with those simple monthly filter cleanings, and don’t forget to give those coils a good spray once a year. Staying consistent means your mini-split will stay efficient and keep you perfectly cool for years to come. Happy cooling!