
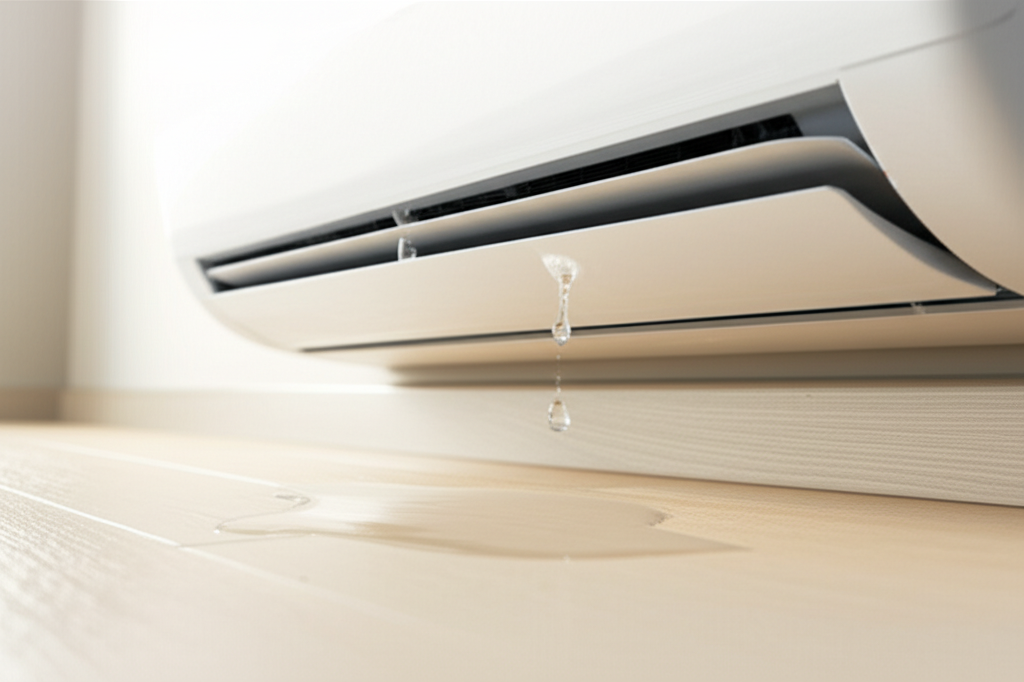
Mini-split leaking water usually means the drain line is clogged, the unit is installed incorrectly, or the filter needs cleaning. Don’t panic! Most causes are simple fixes you can handle today to stop the drip and save your walls.
Hey there, I’m Jack from ACReviewHub.com, and I know seeing water drip from your sleek new mini-split unit can feel like a total disaster. You expect cool air, not a plumbing emergency! It’s easy to feel confused when your AC starts acting up, but most leaks are not signs of a huge breakdown. We are going to walk through this together, step by step. By the end of this guide, you will know exactly why that water is showing up and how to stop it fast.
Understanding Why Your Mini-Split Is Dripping
That water you see is actually normal condensation—it’s what happens when warm, humid air hits the cold coil inside your unit. That water has to go somewhere, and usually, it flows out through a drain line. When it leaks inside, it means something is blocking that path.
The Top 3 Reasons for Indoor Mini-Split Leaks
Most leaks boil down to three simple issues. We’ll look at each one closely, starting with the easiest fix.
- Clogged Condensate Drain Line: This is the number one culprit. Dust, mold, and algae build up inside the small pipe that carries water outside, causing a backup.
- Dirty Air Filter: If the filter is packed with dirt, air can’t flow over the cold coil properly. This causes the coil to freeze up, and when the ice melts, it floods the drain pan.
- Improper Installation/Leveling: If the indoor unit (the head unit) is not perfectly level, the water that condenses might miss the drain pan and drip straight onto your floor or wall.
Ice Buildup: The Hidden Water Source
Sometimes, the drip isn’t a leak—it’s a flood from melting ice. This happens when the system works too hard or the airflow is restricted.
When the coil gets too cold, moisture freezes onto it. Once the unit shuts off or the temperature rises slightly, that ice turns into a big puddle. Check your unit for any visible frost.
Quick Check: Is the Coil Frozen?
If you suspect ice, turn the unit off immediately. Switch the fan setting to ‘On’ (but keep the cooling ‘Off’) for about an hour. This helps thaw the ice safely. If the dripping stops once it thaws, you know restricted airflow is the issue.
Urgent Fixes: Stopping the Drip Today
Don’t wait for water damage to set in! Here are the immediate steps you should take, starting with the easiest part of the system.
Step 1: Clean Those Air Filters (The Easiest Fix)
This is your first line of defense against airflow problems. Dirty filters choke the system, leading to freezing and overflowing.
Here’s the simple cleaning routine:
- Turn off the power to the mini-split at the breaker, just to be safe.
- Gently open the front cover of the indoor unit. You’ll usually see two mesh filters inside.
- Carefully slide or lift the filters out.
- Rinse them under warm running water (use a soft brush if needed for heavy dust). Do not use harsh soap.
- Let them air dry completely before putting them back in.
- Close the cover and turn the power back on.
Step 2: Clearing the Condensate Drain Line
If cleaning the filter didn’t help, the clog is likely further down the pipe. This pipe usually runs outside your home, often near the outdoor compressor unit.
Warning: Never pour harsh chemicals down the drain line. You can damage the system or the environment.
Try this safe clearing method:
- Locate the access point or the end of the drain line outside.
- Use a wet/dry shop vac to gently suck air out of the drain line opening for a minute or two. This often pulls the clog (usually mold or sludge) right out.
- If you can access the indoor end (sometimes near the coil), you can use a small, flexible brush or a blast of pressurized air (not too strong!) to push the blockage toward the outside.
Step 3: Checking the Unit’s Level
This is a setup issue, but it can cause leaks months later if the house settles. Look closely at the indoor unit—it should be perfectly horizontal or slightly slanted toward the drain side.
If it looks obviously tilted, you might need a professional HVAC technician to adjust the mounting bracket. For beginners, just observe if the water seems to pool on one side instead of flowing to the drain area.
| Symptom | Most Likely Cause | What to Do Now |
|---|---|---|
| Water dripping near the wall connection. | Clogged drain line or improper slope. | Vacuum the drain line immediately. |
| Water dripping directly from the center of the unit. | Frozen evaporator coil (low airflow or low refrigerant). | Turn fan on high to thaw the ice. Check filters. |
| Constant slow drip, even when the unit hasn’t run much. | Condensation line disconnected or damaged. | Call a technician for line inspection. |
When to Call the Expert (And Save Money)
While many leaks are DIY fixes, some point to deeper issues that need professional tools and expertise. Knowing when to stop is just as important as knowing how to start!
If you’ve cleaned the filters and cleared the drain line, but the water keeps coming, it’s time to call in a pro. These issues are usually not beginner-friendly:
- Low Refrigerant: If the system is low on refrigerant (due to a leak somewhere else in the sealed system), the coil gets much colder than normal, causing excessive freezing and flooding.
- Damaged Drain Pan: The plastic pan that catches the condensation might have cracked over time.
- Internal Component Failure: Issues with the blower motor or fan assembly can cause condensation to blow off the coil instead of draining properly.
For more detailed energy efficiency tips that can prevent strain on your system, check out the resources available at Energy.gov.
Preventing Future Mini-Split Leaks
The best way to deal with a leak is to make sure it never happens! Consistent, simple maintenance is the secret to a long, drip-free AC life.
Your Simple Monthly Maintenance Checklist
Make these checks part of your routine, especially during heavy cooling seasons.
- Filter Check (Monthly): Inspect filters every month. Clean them if they look dusty, even if you don’t clean them thoroughly every time.
- Outdoor Unit Check (Quarterly): Make sure the area around the outdoor compressor is clear of leaves, dirt, and tall grass. Good airflow outside helps the whole system run smoothly.
- Drain Line Flush (Twice Yearly): Pour a cup of distilled white vinegar down the drain line access point during spring and late summer to naturally inhibit mold growth.
Remember, a well-maintained system doesn’t just prevent leaks; it also uses less energy, saving you money on those summer bills. You can also find great tips on AC selection and sizing at consumer-focused sites like Consumer Reports.
Quick AC Sizing Guide (For Context)
Sometimes, an oversized unit causes excessive moisture removal too quickly, leading to weird performance issues. Here is a rough guide:
| Room Size (Sq Ft) | Recommended Capacity (BTUs) |
|---|---|
| 150 – 250 | 5,000 – 6,000 |
| 350 – 450 | 9,000 – 10,000 |
| 550 – 700 | 12,000 – 14,000 |
Frequently Asked Questions (What Beginners Always Ask)
Q1: Can I use bleach to clean the drain line?
A: Nope! Stick to water or diluted white vinegar. Bleach can corrode the plastic or metal components inside the unit.
Q2: How long should it take for the dripping to stop after I clean the filter?
A: If the filter was the only issue, the dripping should slow down significantly within a few hours once the unit runs normally and thaws any existing ice.
Q3: Does running the fan help if the unit is leaking?
A: Yes, running just the fan (not the cooling mode) helps circulate room-temperature air over the cold coil to melt ice faster, which stops the flooding.
Q4: My outdoor unit is dripping water. Is that bad?
A: Not usually! The outdoor unit is supposed to drain condensation, especially on humid days. If it’s dripping a lot during hot weather, it’s a good sign it’s doing its job.
Q5: How often should the drain line be professionally checked?
A: If you live in a very humid area, an annual check-up during your routine maintenance visit is a smart idea.
Q6: My unit is brand new and already leaking. What gives?
A: This almost always points back to installation. The installer likely didn’t slope the unit or the drain line correctly. Call them back right away!
Wrapping Up Your AC Fix
Seeing a drip is never fun, but you’ve got the knowledge now to handle the most common causes of mini-split leaks. Remember, consistency is key—a quick filter clean now saves you a major headache later. Keep an eye on that drain line, and you’ll enjoy cool, worry-free comfort all season long. Stay cool out there!