
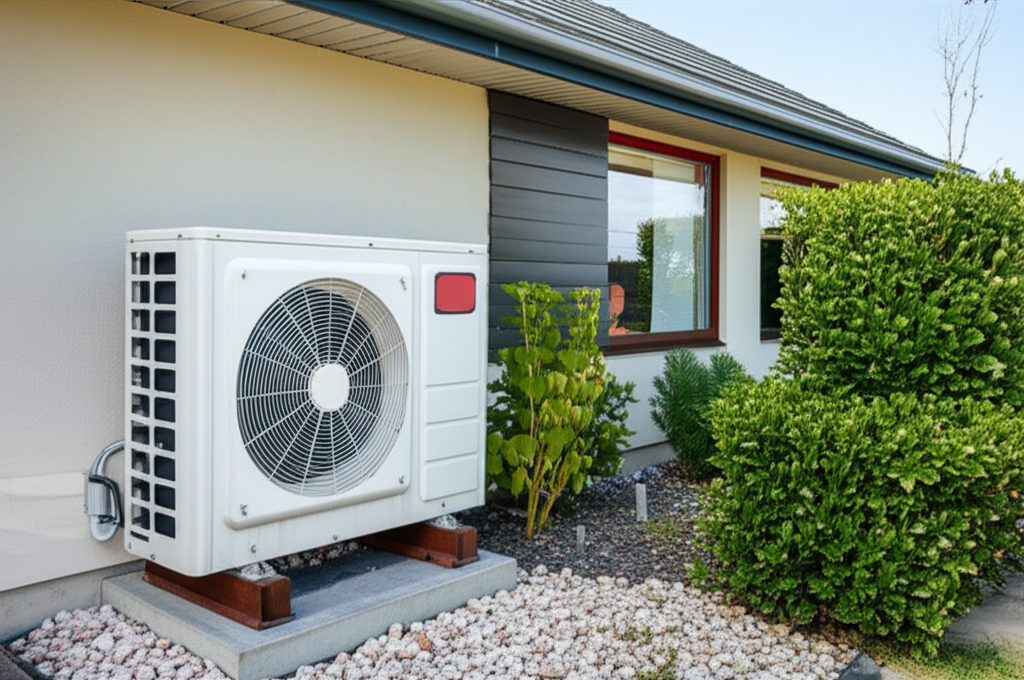
The best location for your mini-split outdoor unit is on a solid, level surface, shaded from direct afternoon sun, away from walls and obstructions, and close enough to the indoor unit to keep piping short, ensuring maximum efficiency and quiet operation.
Are you feeling a bit lost about where to put that big outdoor box for your new mini-split system? You are not alone! Many people worry about setting up their AC just right so it cools well and doesn’t cost too much to run. Getting the location wrong can lead to noisy operation or even make your unit work too hard.
Don’t sweat the details. I’m Jack from ACReviewHub.com, and I promise to walk you through this step-by-step. By the time we are done, you will know exactly where that condenser needs to sit for years of cool comfort.
Why Outdoor Unit Placement Matters So Much
The outdoor unit, sometimes called the condenser, is the hard worker of your mini-split system. It pushes the heat out of your house. Where you put it has a big impact on how well it does its job.
If the unit is in a bad spot, it cannot breathe easily. This makes the whole system less efficient. You end up paying higher electric bills for less cooling power.
A good location keeps the unit safe from weather and noise complaints from neighbors. It is all about balance: easy access for service and the best performance possible.
The Golden Rules: Where NOT to Put Your Outdoor Unit
Let’s start with the big “don’ts.” Avoiding these common mistakes saves you headaches later. Think of these as your first line of defense against AC trouble.
| Mistake | Why It’s a Problem |
|---|---|
| Placing it in direct, all-day sun | The unit has to work harder to shed heat when it’s already baking hot. |
| Too close to walls or bushes | Airflow is blocked, leading to overheating and poor efficiency. |
| Under a window directly over a patio | The noise might bother you or your neighbors when the unit runs. |
| On soft ground or loose dirt | Vibrations cause noise, and moisture can cause rust and damage. |
Rule 1: Give It Plenty of Breathing Room
Mini-split condensers need space to dump the heat they remove from your home. Think of it like needing room to breathe deeply.
Most manufacturers suggest a minimum clearance around the unit. Usually, this means at least 12 to 18 inches on all sides.
Never let tall grass, leaves, or snow pile up against the sides or top. This blockage is the number one killer of efficiency.
Rule 2: Seek Shade, But Not Shelter
This sounds tricky, but it is simple. A little shade is great, but complete enclosure is bad.
If you can place the unit where it gets afternoon shade (say, from a tree or the corner of your house), that is perfect. This lowers the unit’s temperature.
However, you must never build a small box or shed around it. The unit needs open air movement all around it to work correctly.
Rule 3: Keep the Lines Short
The refrigerant lines connect the outdoor unit to the indoor head unit. These lines carry the cooling magic.
The shorter these lines are, the less work the compressor has to do. Less work means lower energy bills and a longer-lasting system.
Try to keep the distance between the inside and outside units under 50 feet if possible. If you go much longer, you might need to add extra refrigerant, which costs money.
Mounting Options: Feet, Wall Brackets, or Roof Racks?
How you secure the unit to the ground or wall is crucial for stability and vibration control. You want it rock solid.
Option A: Ground Mounting (The Most Common Choice)
Most people set the unit on a pad right next to their house. You need a solid, level base for this.
Use pre-made plastic or concrete pads specifically designed for AC units. These lift the unit slightly off the ground.
This prevents standing water from getting into the bottom of the unit and keeps grass from growing up into the coils.
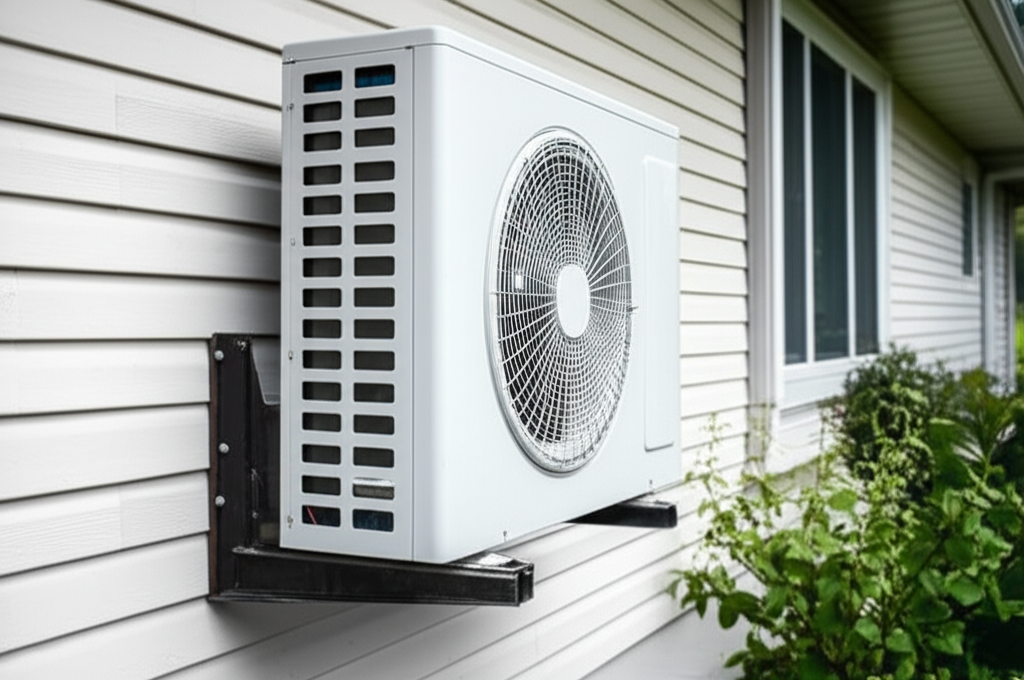
Option B: Wall Mounting (For Tight Spaces)
If you live in a townhome or have a very small yard, you might need to use heavy-duty wall brackets. These metal arms attach securely to the exterior wall studs.
This requires professional installation because the brackets must handle the unit’s weight and vibration safely. Make sure the brackets are rated for the weight of your specific unit.
Option C: Rooftop Mounting (For Commercial or Specific Homes)
While less common for residential mini-splits, sometimes the roof is the only option. This is best left to experienced HVAC pros.
Roofs need special vibration dampeners and sturdy metal racks to support the unit and protect the roofing material underneath.
Checking for Noise and Accessibility
We all want to stay cool, but we don’t want loud machinery running right next to our bedroom window. Noise is a major factor.
When choosing a spot, walk around your property while the unit is running (if possible, during installation testing). Listen for excessive rattling or vibration sounds.
If you place it near a fence, make sure it is not reflecting sound right back into your living space.
Accessibility is also key for maintenance. Technicians need clear space to open the panels, check the refrigerant levels, and clean the coils annually.
Don’t hide the unit behind dense bushes or under a low deck where it is hard to reach. A little planning now saves on expensive service calls later.
Mini-Split System Comparison (Cooling Power)
Knowing the size of your unit helps you judge its footprint and airflow needs. Here is a rough guide on cooling capacity:
| Unit Size (BTUs) | Typical Room Size (Sq Ft) | Outdoor Unit Weight (Approx) |
|---|---|---|
| 9,000 BTU | 200 – 350 sq ft | 50 – 65 lbs |
| 12,000 BTU | 300 – 550 sq ft | 60 – 80 lbs |
| 18,000 BTU | 500 – 1000 sq ft | 80 – 100 lbs |
For more detailed sizing information, always check resources from the Department of Energy, which explains how BTU ratings relate to your home’s insulation and climate (Source: Energy.gov).
Simple Steps for Professional Installation Placement
If you hire a pro (which I highly recommend for the refrigerant lines), here is what they should be doing when selecting the final spot:
- Measure the required clearance (usually 18 inches minimum on all sides).
- Determine the shortest, straightest path for the conduit and lines to the indoor unit.
- Check local noise ordinances, especially if placing the unit near property lines.
- Place the unit on a level, stable, vibration-dampening pad.
- Ensure condensate drain lines have a clear path to drain away from the foundation.
Troubleshooting Common Placement Issues
Sometimes, even with the best intentions, things don’t work perfectly right away. Here is what to check if you suspect the location is causing trouble:
| Symptom | Likely Location Cause |
|---|---|
| Unit runs constantly but never cools well | Blocked airflow (too close to a wall or bush). |
| Loud rattling or vibrating noise | Unit is sitting on uneven ground or the mounting is loose. |
| Unit freezes up or has ice on it | Restricted airflow or the unit is in deep shade and the temperature is too low. |
If you ever need in-depth guidance on air movement standards, the experts at ASHRAE offer excellent technical guides on HVAC design (Source: ASHRAE).
Final Check: Is Your Location Ready?
Before the installer leaves, do a quick walk-around. Does the unit have room to work? Is it accessible? Is it draining properly?
Remember, the outdoor unit is tough, but it still needs a little respect. Give it space, keep it shaded from the hottest sun, and keep the path clear.
Taking a few extra minutes to confirm the placement location is one of the best things you can do for your AC investment. You are now set up for years of efficient, quiet cooling!
Keep cool, and don’t hesitate to check back if you have more AC questions. Jack is always here to help you understand your system!