
Quick Summary: To remove hard mineral deposits (scale) from your air cooler, soak the affected parts in white vinegar for several hours, then scrub gently with a soft brush. Always unplug your unit first for safety.
Are you noticing your air cooler is not blowing as cold as it used to? Maybe you see white, crusty spots inside the water tank or on the cooling pads. This is normal, but it stops your cooler from working its best. Don’t worry about complex chemicals or hiring a pro. I’m Jack from ACReviewHub.com, and I am here to make this simple. We will tackle those tough mineral deposits together using common household items. Get ready to see your cooler run like new again!
Why Mineral Deposits Become Your Cooler’s Worst Enemy
Your air cooler uses water to cool the air. That is how it works! But tap water has minerals, like calcium and magnesium, in it. When the water evaporates, these hard minerals are left behind.
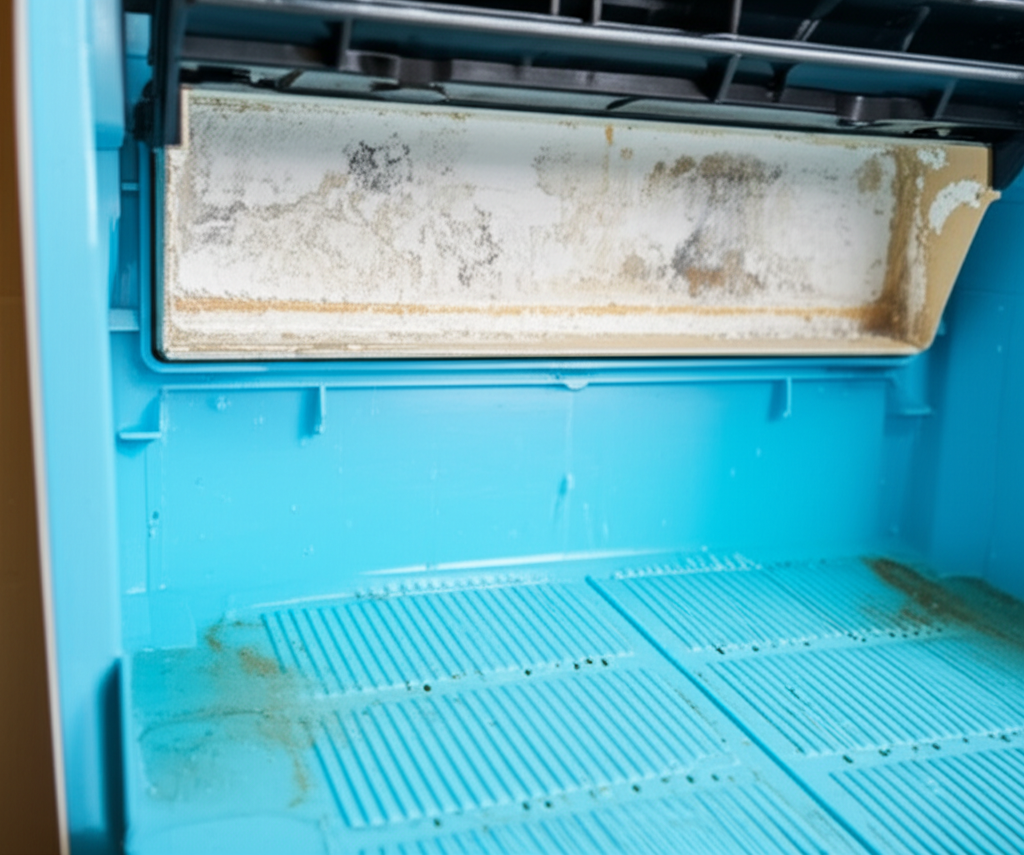
We call this buildup “scale.” Scale acts like a blanket. It covers the cooling pads and the water tank. This blanket stops the cooling process from happening efficiently.
A cooler covered in scale uses more electricity. It also blows warmer air. Fixing this is key to saving money and staying cool.
Safety First: Unplug Before You Attack the Scale
Before you touch any part of your air cooler, safety is number one. Never work on an appliance that is plugged into the wall. Electricity and water do not mix well.
Always unplug the cooler completely from the electrical outlet. If you are unsure where the plug is, just turn off the power breaker to that area of your house for extra peace of mind.
The Brutal Fix: Vinegar Is Your Best Friend for Scale Removal
We are going to use white distilled vinegar. Vinegar is slightly acidic. This acid is strong enough to break down those hard mineral deposits, but it is safe for most cooler parts.
Step 1: Empty and Access the Water Tank
First, drain all the water from the cooler tank. You might have a drain plug near the bottom. If not, carefully tilt the whole unit to pour the water out.
Next, if you can safely remove them, take out the cooling pads. Look for screws or clips holding them in place. If the pads are very crusty, soaking them separately is best.
Step 2: The Vinegar Soak Strategy
For the water tank, you need a strong solution. Mix equal parts of white vinegar and water. A 50/50 mix works great for heavy buildup.
Pour this vinegar solution into the empty water tank. You want the solution to cover all the areas where you see white crusty spots.
If you removed the cooling pads, place them in a large bucket or tub. Pour the 50/50 vinegar solution over them until they are fully submerged.
Step 3: Patience Pays Off (The Waiting Game)
This is the “brutal” part—it requires patience! Let the vinegar soak for at least four hours. For very thick, old scale, let it sit overnight if possible.
The acid in the vinegar is slowly dissolving the hard calcium and magnesium. You will often see bubbles forming; that is the vinegar doing its job.
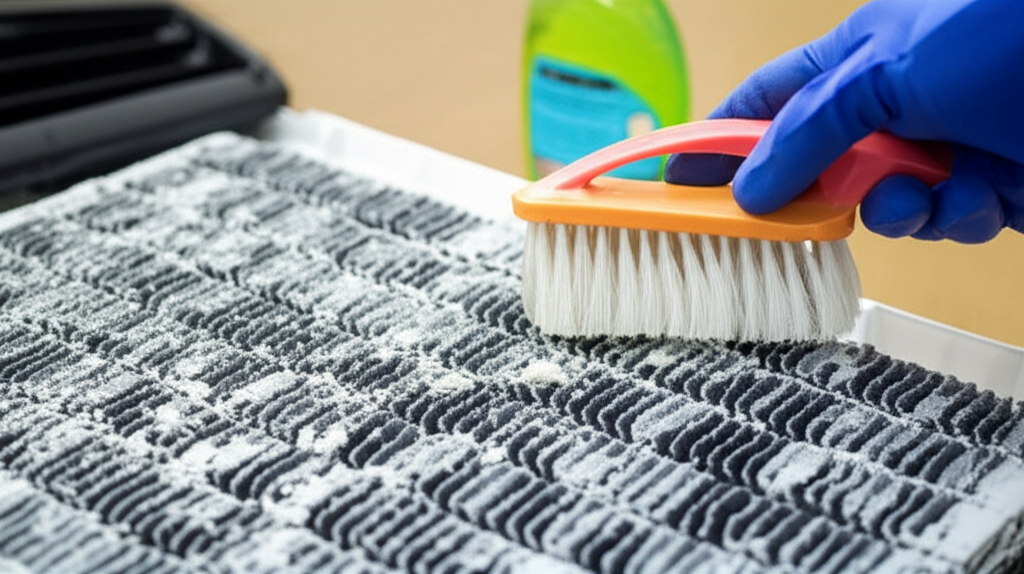
Step 4: Scrubbing and Rinsing for Sparkling Clean
After soaking, it is time to scrub. Use a soft brush, like an old toothbrush or a non-scratch sponge. Do not use steel wool or abrasive scrubbers, as they can damage the plastic or metal inside your cooler.
Gently scrub the loosened scale away. If some spots are still stubborn, apply undiluted vinegar directly to that spot and let it sit for 15 more minutes.
Finally, rinse every single part thoroughly with clean, fresh water. You must wash away all the vinegar smell and residue.
Step 5: Reassembly and Test Run
Once everything is clean and rinsed, let the parts air dry for a bit. Put the cooling pads back in place. Refill the tank with clean, fresh water.
Plug your air cooler back in and run it on a low setting. You should immediately notice better airflow and colder air!
When to Replace Your Cooler Pads
Sometimes, the scale is so bad that the pads are rock hard or falling apart. If scrubbing doesn’t help much, it is time for new pads. New pads absorb water much better.
Here are some signs it is time to replace them:
- Pads feel brittle or crack when touched.
- You see significant discoloration (dark spots or heavy white crust).
- The pads stop soaking up water evenly.
- Airflow seems severely restricted even after cleaning.
Cooler Maintenance Quick Check: Keeping Scale Away Longer
The best way to avoid another “brutal fix” is regular, simple care. Think of this as giving your cooler a little spa day once a month.
Monthly Maintenance Checklist
- Drain the tank completely every few days if you use the cooler daily.
- Wipe down the inside of the tank with a cloth when draining.
- Use distilled water if your tap water is extremely hard (check local water reports).
- Run the “fan only” mode for an hour before shutting down to dry the pads slightly.
If you are interested in learning more about how water quality affects your home appliances, the U.S. Department of Energy has great tips on water conservation and appliance efficiency. Visit Energy.gov for more info.
Understanding Your Cooler Capacity: BTU Basics
While this guide is about cleaning, remember that size matters for cooling power. Air coolers use airflow (CFM) rather than the standard AC measurement (BTU), but knowing the power helps manage expectations.
For comparison, here is a simple chart showing how bigger coolers handle bigger rooms:
| Cooler Size Description | Approximate Coverage Area (Sq Ft) | Best For |
|---|---|---|
| Small Personal Cooler | Up to 150 sq ft | Desk or small bedroom |
| Medium Room Cooler | 150 – 300 sq ft | Living room or master bedroom |
| Large Swamp Cooler | 300+ sq ft | Open floor plans or workshops |
Frequently Asked Questions (FAQ) for Beginner Cooler Owners
Can I use bleach instead of vinegar to clean my cooler?
Bleach is good for germs, but it does not break down mineral scale well. Stick to vinegar for scale. Bleach can also sometimes damage plastic parts if used too strongly.
How often should I completely drain and clean the tank?
If you use your cooler every day, drain and rinse it at least twice a week. Deep clean with vinegar once a month, especially in dry, hard-water areas.
My cooler smells musty even after cleaning. What now?
A musty smell means the pads are staying too wet. Make sure you run the fan-only mode for 30 minutes before shutting off the unit completely. This dries the pads out.
Is distilled water really worth the extra cost?
If you have very hard water, yes! Distilled water has zero minerals. Using it means you might only need to clean the unit every few months instead of monthly.
Can I clean the exterior of the cooler?
Absolutely! Wipe down the outside plastic casing with a damp cloth and mild soap. Avoid spraying water directly into the vents or control panel.
Conclusion
See? That wasn’t so bad! Removing those tough mineral deposits might sound scary, but with simple white vinegar and a little elbow grease, your air cooler will be breathing easier in no time. Consistent, small maintenance steps are the secret to saving energy and keeping your cool comfort high all season long. Keep up the great work, and enjoy that fresh, cold air!