
If your AC hums but won’t start cooling, the capacitor is often the culprit. Replacing this small electrical part is an easy DIY fix that restores your unit’s power, saving you a service call. We’ll walk you through it safely!
Is your air conditioner making noise but just not blowing cold air? That is frustrating, especially when the weather heats up. AC systems can seem complicated, full of wires and technical parts. Many homeowners worry that any strange noise means an expensive repair bill.
But don’t worry one bit! I’m Jack from ACReviewHub.com, and I promise to make this easy. Today, we are tackling one of the most common AC issues: a bad capacitor. We will break down what a capacitor is, how to tell if yours is failing, and how to swap it out safely. You’ll feel like an AC pro when we are done!

What Exactly Is an AC Capacitor? (The Simple Explanation)
Think of your AC unit like a car engine that needs a jump start every time you turn the key. That is what the capacitor does for your AC compressor and fan motors.
The capacitor is a small, cylindrical component. Its job is simple: it stores electrical energy. It then releases a big burst of power when the AC needs to start up its main parts—the compressor and the fan.
If the capacitor gets old or weak, it can’t give that necessary jolt of energy. This means the motor hums, but it cannot actually start spinning. No spin, no cooling!
Signs Your AC Capacitor Needs Replacing
Spotting a failing capacitor early is key to a quick fix. You might see one or more of these signs when your AC acts up.
- The AC unit is humming loudly, but the outside fan or the compressor won’t start running.
- The AC tries to start, clicks off, and then tries again a few minutes later (this is called short-cycling).
- Your AC takes a very long time to start up, sometimes needing several attempts.
- The unit runs, but the air coming from the vents is not as cold as it should be.
Safety First: Before You Touch Anything!
This is the most important part of the whole job. Capacitors hold a serious electrical charge, even when the power is turned off at the thermostat. You must cut the power completely.
Here are the non-negotiable safety steps:
- Turn Off the Thermostat: Set your indoor thermostat to the “Off” position.
- Cut Power at the Breaker: Go to your main electrical service panel (breaker box). Find the breaker labeled for your AC unit (it’s usually a double-pole switch) and flip it firmly to the “Off” position.
- Confirm Power Is Off: Before opening any panels, try turning the AC on at the thermostat. Nothing should happen—no humming, no lights, nothing.
- Wait a Few Minutes: Give the system a moment to naturally discharge any remaining small charge.
Step-by-Step Guide: How to Replace the AC Capacitor
Once power is confirmed off, you are ready to work on the outdoor unit (the condenser). This process is straightforward if you follow these steps closely.
Step 1: Access the Outdoor Unit
Locate the access panel on the side of your outdoor unit. This panel is usually held on by a few simple screws. Use a screwdriver to remove these screws and carefully set the panel aside.
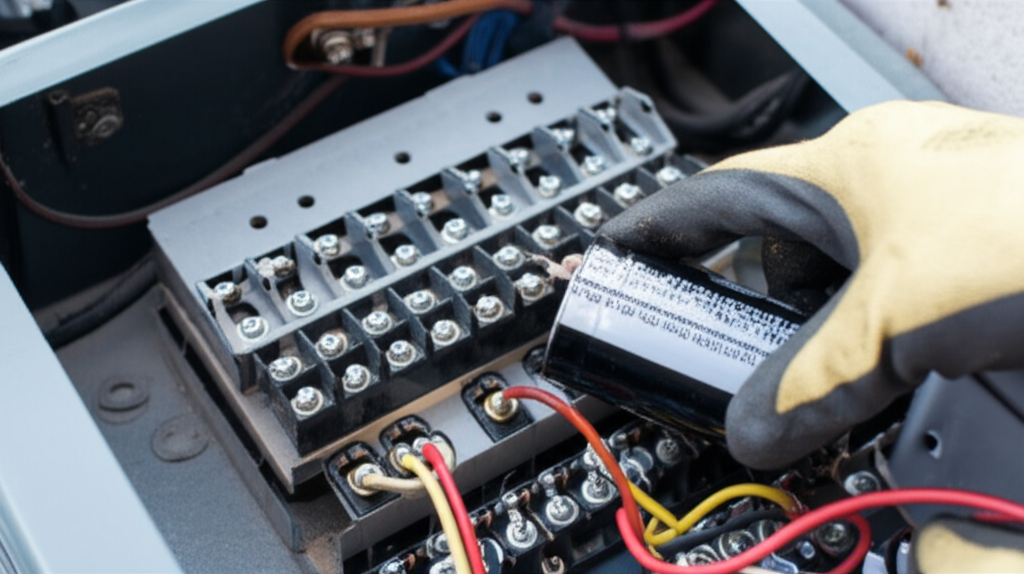
Step 2: Locate and Identify the Capacitor
The capacitor is usually a metal cylinder sitting near the top or side of the unit, often near the compressor. It will have several wires connected to it. Take a picture with your phone right now!
This picture is your roadmap for wiring everything back up correctly.
Step 3: Discharge the Old Capacitor (Crucial Step!)
Even with the power off, you must drain the stored energy. Get a screwdriver with a heavy, insulated handle. Touch the metal tip of the screwdriver across the terminals (the connection points) on the capacitor. Touch one terminal, then touch that same tip to the next terminal. Do this for all combinations of terminals. You might hear a small pop or see a tiny spark—that’s good! It means you safely discharged it.
Step 4: Match the New Capacitor
Capacitors must match exactly. Look closely at the old one for two important numbers printed on the side:
| Capacitor Reading | What It Means |
|---|---|
| Microfarads (µF or MFD) | This is the capacitance rating (e.g., 40/5 µF). You must match this number. |
| Voltage (VAC) | This is the maximum voltage (e.g., 370V or 440V). Always buy one with the same or higher voltage rating. |
You can usually buy the correct replacement capacitor online or at any local HVAC supply store. Take the old one with you to be sure!
Step 5: Remove the Old Wires
Using needle-nose pliers or a small pair of wire cutters, gently disconnect the wires one by one from the terminals on the old capacitor. Refer to the photo you took in Step 2 to remember which color wire went to which post (C, Herm, or Fan).
Step 6: Install the New Capacitor
Connect the wires to the matching terminals on the new capacitor. Make sure the connections are snug and secure. If your new capacitor has a different shape or mounting bracket, secure it tightly using the original screw holes.
Step 7: Test and Reassemble
Put the access panel back on but leave the screws loose for now. Go back inside and turn the AC breaker back on. Turn the thermostat to “Cool” and a low setting. The fan should start quickly, and the unit should begin cooling normally.
If it works, turn the power off again at the breaker, secure the panel screws completely, and enjoy your cool air!
Troubleshooting: What If It Still Won’t Start?
If replacing the capacitor didn’t fix the issue, don’t panic. It often means another part is worn out. Here is a quick look at what else might be wrong:
| Symptom | Possible Cause (Other Than Capacitor) |
|---|---|
| Unit hums but immediately trips the breaker. | Bad compressor motor (a much bigger repair). |
| Fan runs, but the compressor does not start at all. | Blown contactor or bad start relay. |
| Unit starts, runs for a minute, then stops. | Low refrigerant charge or an overheating issue. |
If you suspect the compressor itself is bad, it is time to call in a professional. For more detailed wiring diagrams, you can always check out resources like Energy.gov’s HVAC guides.
Common Beginner Mistakes to Avoid
When working with electrical components, a few simple slips can cause big problems. Stay ahead of these common pitfalls:
- Forgetting to Discharge: Never skip draining the old capacitor. This is a serious safety risk.
- Mixing Up Wires: If you connect the fan wire to the compressor terminal, you will immediately burn out your new capacitor or damage the motor. Always use your reference photo!
- Buying the Wrong Size: A capacitor with the wrong microfarad rating will cause the motor to struggle, overheat, and fail quickly. Match the numbers exactly.
- Working on a Live Unit: Double-check the breaker three times. Electricity is unforgiving.
Frequently Asked Questions (FAQ)
Q: How much does a new AC capacitor cost?
A: Usually, they are inexpensive! A common dual capacitor costs between $20 and $50 online or at an AC parts store.
Q: How long does an AC capacitor usually last?
A: A good quality capacitor can last 10 to 15 years. Heat is their biggest enemy, so units in very hot climates might fail sooner.
Q: Can I use a capacitor with a higher voltage rating?
A: Yes! If your old one was 370V, a 440V replacement is perfectly fine and often safer.
Q: Does this work for my indoor furnace blower too?
A: This guide is mainly for the outdoor unit (condenser). Indoor furnace blowers use different, smaller capacitors, but the safety rules are the same.
Q: How do I know if I need a single or dual capacitor?
A: Most modern central AC units use a dual capacitor, which handles both the fan and the compressor in one housing. If you see two sections combined into one cylinder, it’s dual.
Q: If I’m not comfortable doing this, who should I call?
A: Call a certified HVAC technician. Safety is always more important than saving a few bucks.
Replacing a failing capacitor is one of the most satisfying DIY fixes you can perform on your AC system. It brings the cool air back without waiting for a service appointment. Remember to always prioritize safety by cutting that breaker power first.
Stay cool, keep up with simple maintenance, and you’ll keep saving money and energy all year long. You’ve got this!