
A clogged AC drain line can cause water leaks and prevent your AC from cooling properly. Flushing it is a simple DIY fix that takes minutes and can save you a costly repair!
Is your air conditioner acting up? Maybe it’s not cooling as well as it used to, or you’ve noticed a strange damp spot near your indoor unit. Don’t worry, these are common issues, and often, the fix is simpler than you think. I’m Jack from ACReviewHub.com, and I’m here to make understanding and caring for your AC easy. We’ll walk through this step-by-step, so you can feel confident tackling it yourself.
This guide will show you exactly how to flush your AC drain line. It’s an easy fix that can make a big difference in how your AC performs and help you avoid bigger problems down the road. Let’s get your cool air flowing freely again!
Why Your AC Drain Line Needs a Flush
Your air conditioner works by removing moisture from the air. This moisture collects as water, called condensation. This water drips into a drain pan and then flows out of your home through a drain line. Think of it like the drain under your kitchen sink.
Over time, dust, mold, and algae can build up in this drain line. This gunk can clog the line, preventing water from draining. When this happens, the water can back up. It might overflow the drain pan and cause water damage inside your home. It can also cause your AC system to shut down to prevent further damage.
Signs Your AC Drain Line is Clogged
You might be wondering how to tell if your drain line is the culprit. Here are a few tell-tale signs to look out for:

- Water pooling: The most obvious sign is water leaking from your indoor AC unit or near it.
- AC not cooling: A clogged drain can sometimes trigger a safety switch that turns off your AC.
- Musty odors: Stagnant water in the drain pan can lead to mold and mildew, causing a damp, musty smell.
- High humidity: If your AC isn’t removing moisture effectively, your home might feel more humid than usual.
What You’ll Need to Flush Your AC Drain Line
Gathering your supplies beforehand makes the job go smoothly. You don’t need anything fancy for this task!
- Wet/Dry Vacuum: This is the most effective tool for clearing blockages.
- Funnel: To pour cleaning solution into the drain line.
- Cleaning Solution: You have a few options here:
- Distilled Water: A good first step for a minor clog.
- Vinegar: A natural disinfectant that helps break down grime. Use a 1:1 mixture of white vinegar and water.
- Bleach: More powerful for stubborn mold and algae. Use a 1:4 mixture of bleach and water. (Use caution and good ventilation when using bleach.)
- Special AC Coil Cleaner: Available at hardware stores, designed specifically for this purpose.
- Rag or Towel: To clean up any drips.
How to Flush Your AC Drain Line: Step-by-Step
Don’t be intimidated! Following these simple steps will have your drain line clear in no time.
Step 1: Locate the Drain Line
The drain line is usually a PVC pipe sticking out of the wall near your indoor AC unit (often called the air handler or furnace). It might be a white or gray pipe. Sometimes, it exits through the side of your house or goes down to your basement or crawl space.
Step 2: Find the Access Point
You’ll need to find where to pour your cleaning solution. Often, there’s a vertical pipe cap or a tee fitting connected to the drain line near the air handler. This is your access point. If you can’t find one, you might need to disconnect the drain line from the unit, but try to find an access point first!
Step 3: Use Your Wet/Dry Vacuum
This is a crucial step for removing loose debris.
Go to the end of the drain line (where the water exits your house). Attach your wet/dry vacuum to the end of the pipe. Seal it as best you can with a rag or tape to create suction. Turn on the vacuum for about 30-60 seconds. This will pull out any loose gunk and water from the line.
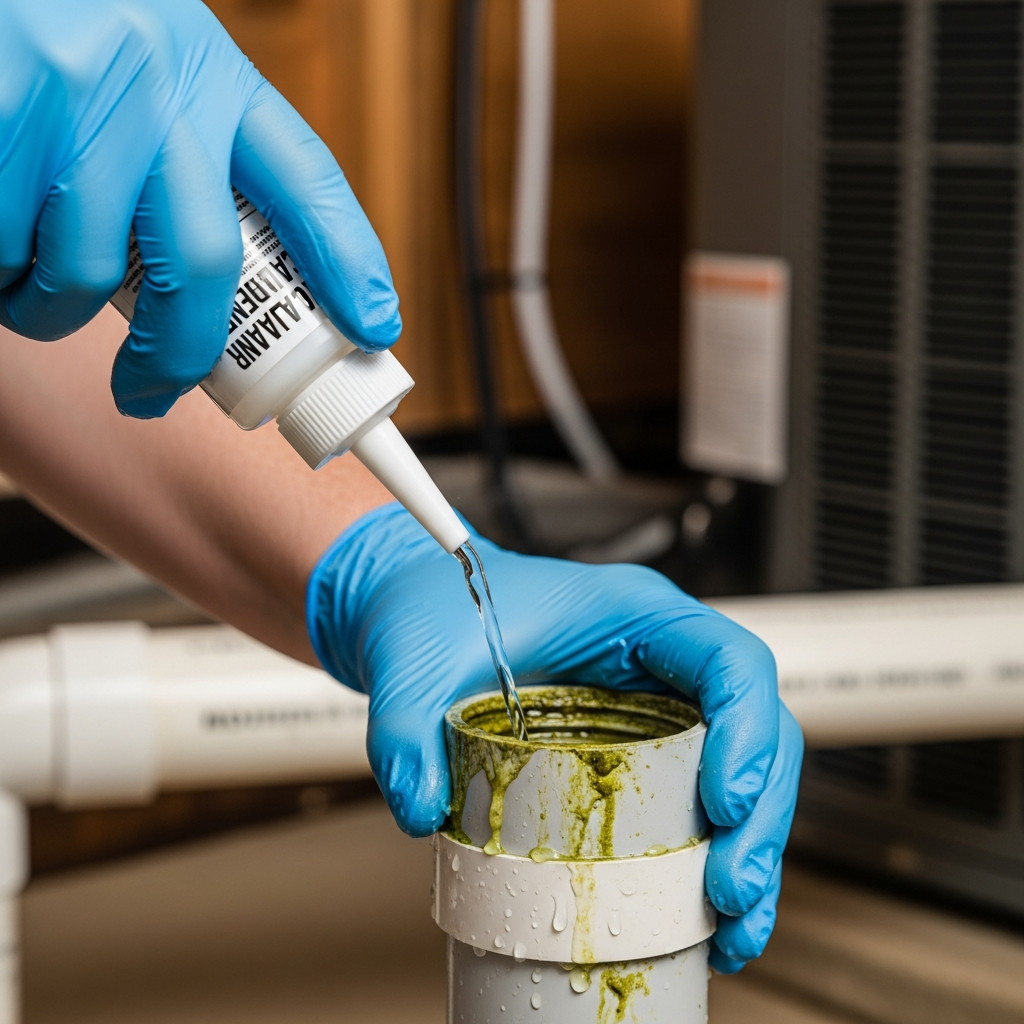
Step 4: Pour in Your Cleaning Solution
Now it’s time to clean the inside of the pipe.
Go back to the access point you found in Step 2. Remove the cap or plug. Place your funnel into the opening. Slowly pour your chosen cleaning solution (distilled water, vinegar mixture, bleach mixture, or coil cleaner) into the funnel. You’ll want to pour about 1-2 quarts of solution.
Step 5: Let it Sit (Optional but Recommended)
Giving the solution some time to work can make a big difference.
Replace the cap or plug on the access point. Let the solution sit in the drain line for about 30 minutes to an hour. This allows it to break down any stubborn clogs, mold, or algae.
Step 6: Flush with Water
Now, you’ll flush out the loosened debris and cleaning solution.
You can do this in two ways:
- Using the Wet/Dry Vacuum: Go back to the exit point of the drain line. Reattach your wet/dry vacuum and run it for another 30-60 seconds to pull out the remaining liquid and debris.
- Using Plain Water: Pour another quart or two of plain distilled water into the access point (as you did in Step 4). This will help push everything out.
Observe the end of the drain line to see if clear water is flowing out. If it’s still slow or not draining, you might need to repeat the process or try a stronger cleaner. If you’re still having trouble, it might be time to call a professional.
Step 7: Check for Leaks and Test
Once you’re done, do a final check.
Make sure all caps and plugs are securely in place. Turn on your AC system. Let it run for about 15-20 minutes. Then, check the drain pan and the area around your indoor unit for any signs of leaks. You should also notice better airflow and cooling.
Troubleshooting Common AC Drain Line Issues
Sometimes, things don’t go exactly as planned. Here’s a quick look at common problems and what to do.
| Symptom | Possible Cause | Solution |
|---|---|---|
| Water still pooling after flushing | Stubborn clog, or the clog is further down the line than the vacuum can reach. | Repeat the flushing process, potentially with a stronger cleaner. Consider using a drain line brush or calling a professional for a more powerful snake. |
| Musty smell persists | Mold or mildew in the drain pan or evaporator coils, not just the drain line. | Clean the drain pan separately. You may need to clean the evaporator coils (often a job for a professional). Ensure the drain line remains clear to prevent future buildup. |
| AC shuts off intermittently | Float switch activated due to high water level in the drain pan. | Ensure the drain line is completely clear and water is draining freely. If the issue continues, the float switch itself might need checking or replacement. |
Preventative Maintenance for Your AC Drain Line
Keeping your drain line clear is much easier than fixing a water leak! Regular maintenance is key.
- Monthly Flushing: During cooling season, pour about a cup of distilled water or a vinegar/water mixture into the drain line access point once a month. This helps prevent buildup.
- Annual Professional Check-up: Schedule an annual AC tune-up with a qualified technician. They can inspect and clean the drain line and other critical components.
- Keep the Area Around the Unit Clean: Dust and debris can enter the drain line. Keeping the area around your indoor unit clean reduces the amount of gunk that can get in.
- Consider a Condensate Pump Alarm: If your drain line is prone to clogging and you’re worried about water damage, a condensate pump alarm can alert you if the water level gets too high.
For more on general AC maintenance, check out the U.S. Department of Energy’s tips for maintaining your home cooling system.
Frequently Asked Questions (FAQs)
How often should I flush my AC drain line?
During the cooling season, aim for once a month with a simple flush (like distilled water or a vinegar mix). This is a great preventative step.
Can I just pour bleach down the drain line?
You can use a diluted bleach solution (about 1 part bleach to 4 parts water), but use it sparingly and with good ventilation. Vinegar or special AC cleaners are often safer and just as effective for regular maintenance.
What if I can’t find the drain line access point?
If you can’t locate an easy access point near your indoor unit, you might need to disconnect the line. If you’re not comfortable with this, it’s best to call an HVAC professional. They have the tools and expertise.
How do I know if the clog is really gone?
After flushing, turn on your AC and let it run. Check the drain pan and the end of the drain line. You should see clear water dripping freely from the end of the line, and the drain pan should be dry.
My AC is still not cooling well after flushing the drain line. What else could it be?
A clogged drain line can affect cooling, but other issues could be at play, like dirty air filters, low refrigerant, or problems with the outdoor unit. If flushing the drain line doesn’t solve your cooling problem, it’s time to have a technician take a look.
Is it safe to do this myself?
Yes, flushing the AC drain line is a very safe and common DIY task. Just follow the steps carefully, use basic precautions (like ventilation if using bleach), and you should be fine!
Stay Cool and Save Money!
Taking care of your air conditioner doesn’t have to be complicated or expensive. By learning simple maintenance tasks like flushing your AC drain line, you’re actively keeping your system running efficiently. This not only helps you stay cool and comfortable but also saves you money on energy bills and prevents costly repairs down the line.
Keep up with these small steps, and your AC will thank you with reliable, cool air all season long. Happy cooling!