
A failing AC blower relay usually means your fan won’t turn on, even though the thermostat is calling for cool air. Testing it is simple! After turning off the power, you’ll use a multimeter to check for continuity across the low-voltage coil and verify resistance. I’ll show you exactly how to safely check this small but mighty component in just a few easy steps.
How to Test AC Blower Relay: Best Essential Steps
Hey there! It’s Jack from ACReviewHub.com. I know how frustrating it is when your air conditioner kicks on but the inside fan—the blower—just sits there silently. You hear the outdoor unit running, but no cool air is moving into your house. This usually points straight to a problem with the blower motor or, more commonly, the blower relay.
Don’t worry! That relay is just a small, inexpensive switch that controls the power flow to the fan. Instead of immediately calling an expensive technician, I’m going to show you how to safely test this component yourself. It’s easier than you think, and it can save you a bundle. Let’s grab our tools and get cool again!
What Exactly Is an AC Blower Relay?
Think of the blower relay as the traffic cop for your indoor fan motor. When your thermostat tells the AC, “Hey, I need cooling,” that signal first goes to the relay. The relay then closes an internal switch, allowing high-voltage electricity (usually 120V or 240V) to flow to the blower motor.
It has two parts: a low-voltage coil (the signal side) and high-voltage contacts (the power side). If the coil fails, the contacts never close. If the contacts burn out, the power never reaches the fan. When the relay is faulty, the fan doesn’t blow air.
Safety First: Power Down Before You Touch Anything
Whenever we deal with AC components, especially electrical ones, safety is the most important thing. You are working near high voltage. We must cut all power sources completely.
- Turn Off the Thermostat: Set your thermostat to the “Off” position.
- Find the Furnace/Air Handler Breaker: Locate your main electrical panel (breaker box). Find the circuit breaker labeled for your furnace or air handler (the indoor unit). Flip it to the “Off” position.
- Double-Check Power: If your air handler has a separate service switch mounted nearby (it often looks like a light switch), flip that off too.
- Confirm Zero Power: Use a non-contact voltage tester to touch the metal housing of the air handler. The tester should show no voltage present. If it beeps, you still have power on somewhere. Stop and find the source!
Step 1: Locate and Access the Blower Relay
The blower relay is typically found inside the air handler unit, usually near the blower motor itself or on the main control board.
- Open the Access Panel: Remove the screws or open the latches on the main access panel of your indoor unit (the furnace or air handler).
- Find the Relay: The relay often looks like a small, black cube or a rectangular box plugged into the control board. It will have several wires attached.
- Take a Picture: Use your phone to take a clear photo of the wiring setup before you disconnect anything. This is your map for putting it back together!
Step 2: Prepare Your Multimeter
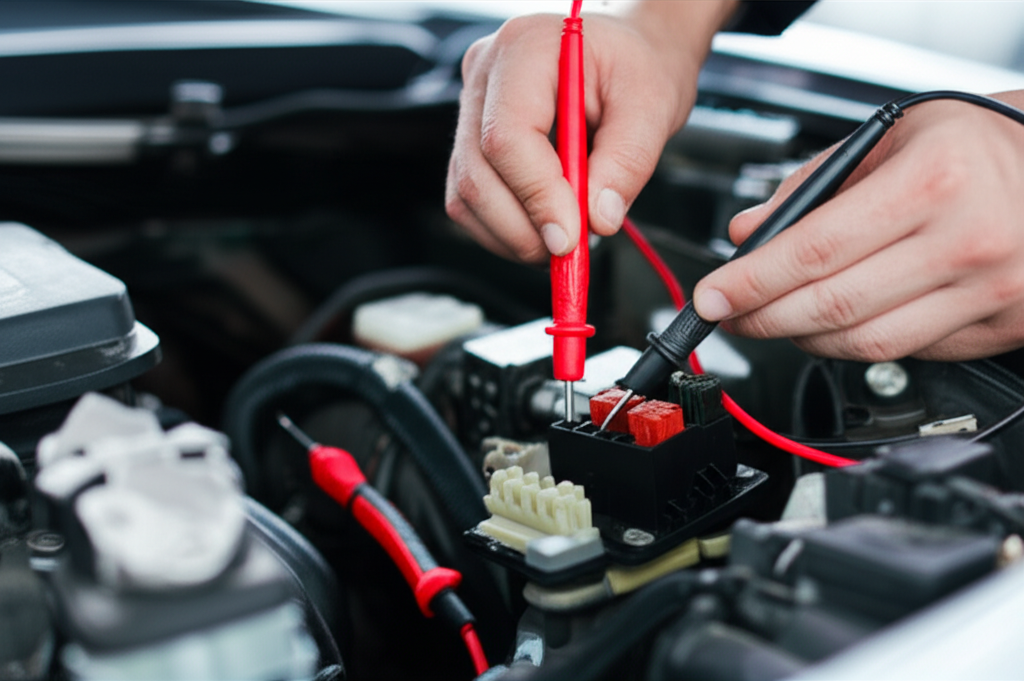
To test the relay, we need a standard digital multimeter. This tool lets us measure electrical resistance (Ohms) and continuity.
Set your multimeter to the Ohms setting (Ω). If your multimeter has an audible continuity setting (it beeps when there’s a good connection), that works too. We are first going to test the low-voltage coil.
Step 3: Test the Low-Voltage Coil (The Signal Side)
The low-voltage coil is what activates the relay. It usually receives 24 volts (the thermostat signal). We are testing the resistance of this coil.
What you need to do:
- Identify Coil Terminals: Locate the two small terminals on the relay that connect to the low-voltage (often smaller) wires. These are the coil terminals.
- Place Probes: Touch one multimeter probe to each of the two coil terminals.
- Read the Measurement: A working relay coil should show a resistance reading, usually between 10 and 100 Ohms. The exact number isn’t critical, but it needs to be something.
- Analyze the Results:
- Good Result: You get a reading (e.g., 50 Ω). The coil is fine.
- Bad Result (Open Circuit): The meter reads “OL” (Over Limit) or “1.” This means the coil is broken, and the relay needs replacement.
- Bad Result (Short Circuit): The meter reads 0 Ω. The coil is shorted, and the relay needs replacement.
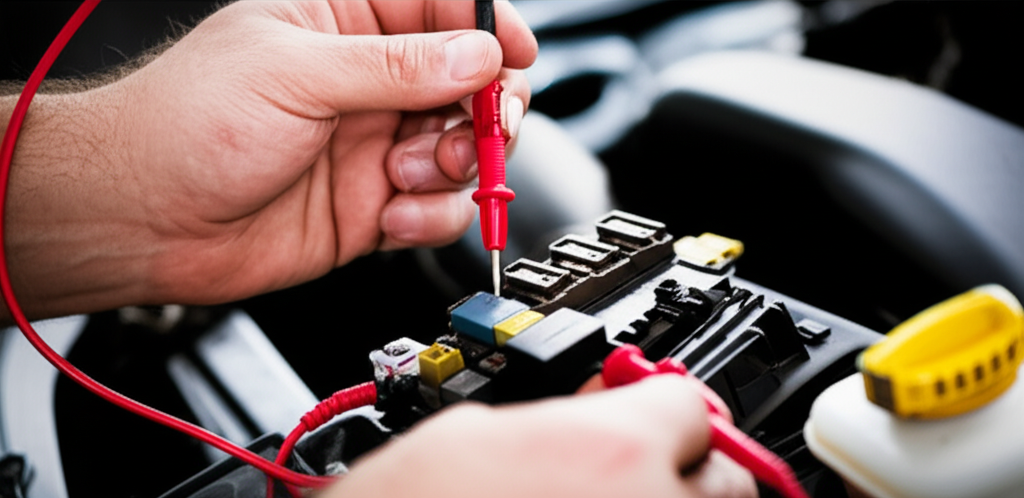
Step 4: Test the High-Voltage Contacts (The Power Side)
Now we test the main power contacts. When the relay is off (de-energized), these contacts should be open, meaning no power flows through them. We check for continuity between the input and output terminals.
What you need to do:
- Identify Contact Terminals: Locate the terminals that connect to the thicker, high-voltage wires. These are the main contacts.
- Place Probes: Touch one multimeter probe to the input terminal and the other to the output terminal of the contacts you are testing.
- Read the Measurement (De-Energized State): Because the relay is off and power is removed, there should be no connection. The multimeter should read “OL” or “1” (infinite resistance).
- Analyze the Results:
- Good Result: Meter reads “OL.” The contacts are open, which is correct when the relay is off.
- Bad Result (Stuck Contacts): The meter reads 0 Ω or beeps (if using continuity mode). This means the contacts are stuck closed (welded). The relay is faulty and must be replaced.
If you found a fault in either the coil (Step 3) or the contacts (Step 4), you’ve found your problem! It’s time to replace the relay.
Troubleshooting Chart: AC Blower Issues
If your relay tested perfectly fine, the issue lies elsewhere. Here is a quick guide to other common blower problems.
| Symptom | Possible Cause | Simple Fix/Check |
|---|---|---|
| Blower motor runs constantly (never shuts off). | Stuck or welded relay contacts (replace relay). | Check thermostat wiring (possible short). |
| Blower motor won’t turn on at all. | Failed relay coil (replace relay). | Check capacitor (a bulge means replacement needed). |
| Blower motor runs slowly or struggles. | Bad start capacitor. | Check air filter (clogged filter causes strain). |
| Blower motor hums but doesn’t spin. | Motor seized or bad capacitor. | Turn off power, try manually spinning the fan blade. |
For more detailed troubleshooting, especially if you suspect a motor issue, Consumer Reports has excellent resources on AC maintenance and repair.
Replacing a Faulty Blower Relay
Replacing the relay is usually straightforward if you can get the exact replacement part. Remember that picture you took? It’s time to use it!
- Disconnect Wires: Carefully pull the wires off the old relay terminals. Note that some relays are soldered to the control board, requiring a technician. Most modern relays are plug-and-play.
- Remove the Old Relay: If it’s plugged in, gently wiggle and pull the old relay out of the socket or control board.
- Install the New Relay: Line up the pins on the new relay and firmly press it into the socket.
- Reconnect Wires: Use your photo to reconnect all the wires exactly where they belong. Double-check every connection.
- Restore Power and Test: Replace the access panel, flip the circuit breaker back on, and set the thermostat to “Cool.” Listen for the blower motor to kick on smoothly.
Friendly AC Maintenance Tips from Jack
A failing relay sometimes signals that your system is working too hard. Keeping up with simple maintenance can prevent small issues from becoming big, expensive ones.
- Change Your Filter Regularly: This is the number one rule! A dirty filter makes the blower motor strain, which can overheat components like the relay and motor. Check it every 30–90 days.
- Keep Coils Clean: Ensure the outdoor condenser coils are free of dirt, grass, and debris. This improves efficiency and reduces strain on the whole system.
- Clear the Drain Line: The condensate drain line can clog, leading to water damage and sometimes shutting down the system. Pour a cup of vinegar down the line twice a year to prevent algae growth.
Frequently Asked Questions (FAQ)
What is the difference between a relay and a contactor?
That’s a great question! Both are switches, but the contactor is usually found in the outdoor unit (condenser) and handles the huge power load for the compressor. The relay is usually indoors and handles the smaller load for the blower fan or other auxiliary functions.
Can I bypass the AC blower relay to test the fan motor?
Yes, you can temporarily jump the high-voltage contacts using a jumper wire (with power OFF!) to see if the motor runs when directly powered. However, only do this if you are comfortable working with electrical components, and always ensure all main power is disconnected before connecting the jumper.
How much does a new blower relay cost?
Blower relays are usually inexpensive. Depending on the brand and complexity, you can expect to pay anywhere from $15 to $50 for the part itself. The labor cost is where you save money by doing it yourself!
Why do blower relays fail?
They usually fail due to age, constant on/off cycling, or excessive heat. Over time, the low-voltage coil can burn out, or the high-voltage contacts can pit and eventually weld shut from electrical arcing.
My fan runs, but the air isn’t cold. Is it the relay?
Nope. If the fan is running, the blower relay is doing its job. No cold air means the problem is likely with the outdoor unit—like a low refrigerant level, a bad compressor, or a failed contactor.
See? That wasn’t so bad! You successfully isolated the blower relay, performed a professional test using a multimeter, and diagnosed the fault. Taking control of your AC maintenance is empowering and saves you serious money.
Keep those filters clean, keep learning these small fixes, and you’ll enjoy efficient, reliable cooling for years to come. Stay cool, neighbor!