
Superheat is the most critical measurement to ensure your AC is correctly charged with refrigerant. It tells you if the compressor is safely moving pure gas, not liquid. By following these easy steps, you can diagnose cooling issues, prevent compressor damage, and save big on energy bills. You’ve got this!
Measure AC Superheat: Essential, Easy Diagnostic Steps
Hey there! If your air conditioner isn’t cooling like it should, or if you’re just tired of high energy bills, you might be feeling a little frustrated. AC systems can seem confusing with all the technical jargon, but I promise you, understanding the basics is easier than you think.
Today, we’re going to tackle one of the most important diagnostic measurements in your AC system: Superheat. Don’t worry about the fancy name. Superheat is simply a number that tells us if your AC system has the right amount of refrigerant and is running safely.
Ready to learn a simple technique that can save your AC compressor and keep your home perfectly cool? Let’s dive in!
What Exactly is AC Superheat? (The Simple Explanation)
Think of your AC system like a loop where refrigerant changes from a cold liquid into a cool gas. This gas absorbs heat from your home. The compressor then pushes that gas outside to dump the heat.
Superheat is the amount of heat added to the refrigerant after it has fully turned into a gas. It’s measured on the suction line (the larger, insulated copper line leading back to the outdoor unit).

Why is this important? If the superheat is too low, liquid refrigerant might be traveling back to the compressor. Liquid destroys compressors. If the superheat is too high, the system is starving for refrigerant, causing overheating and poor cooling efficiency.
The goal is to ensure the refrigerant is 100% gas before it hits the compressor. Superheat is our safety buffer.
Tools You Will Need for This Easy Test
Before we start, let’s gather the gear. You don’t need a huge toolbox, just a few specific items. Make sure your AC unit has been running for at least 15 minutes before taking measurements so the system is stabilized.
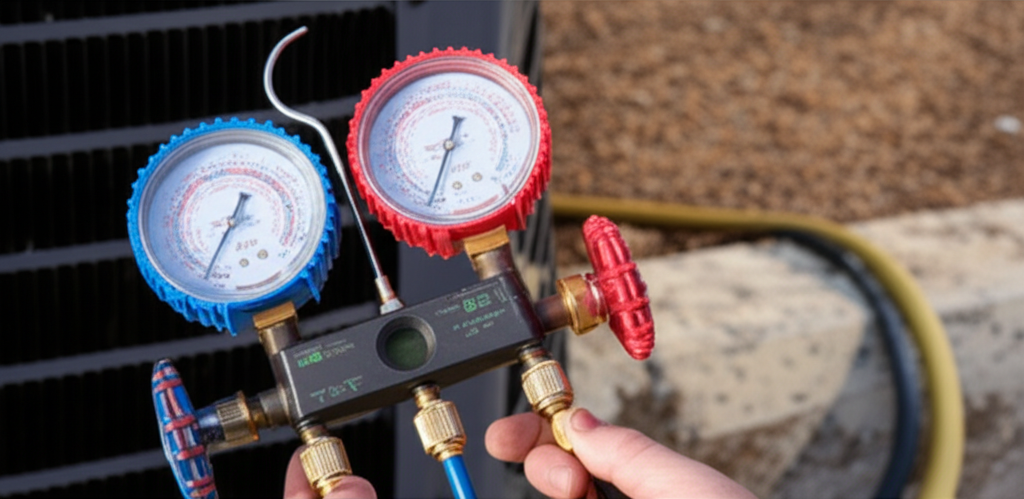
- Manifold Gauge Set: This connects to the service ports on your outdoor unit (condenser).
- Digital Thermometer (Clamp-on style preferred): Essential for measuring the temperature of the suction line.
- Pressure-Temperature (PT) Chart or Digital Gauges: This chart (often found on the gauge set packaging or online) converts the pressure reading into a temperature reading.
Expert Tip: If you are just starting out, digital manifold gauges are great because they calculate many of these values for you instantly. But the old-school gauges and a PT chart work perfectly well, too!
Step 1: Get the Suction Line Temperature (SLT)
This is the first piece of the puzzle. We need to know the temperature of the cold gas returning to the compressor.
- Locate the large, insulated copper pipe (the suction line) on your outdoor AC unit.
- Carefully remove about 6 inches of the foam insulation near the service valve.
- Attach your clamp-on digital thermometer directly to the clean copper pipe.
- Wait about two minutes for the reading to stabilize.
- Write down this number. This is your Suction Line Temperature (SLT).
Remember, this line should feel cool or even cold to the touch. If it feels warm, that’s a big sign something is off!
Step 2: Measure the Suction Pressure (Saturation Temperature)
Next, we need to connect the gauges to find out the pressure inside that same suction line. This pressure corresponds to the temperature where the refrigerant is boiling (changing from liquid to gas).
- Connect the blue hose (low-side) of your manifold gauge set to the service port on the large suction line.
- Open the service port valve and wait for the pressure gauge needle to settle.
- Read the pressure on the gauge. This is your Suction Pressure (PSIG).
- Now, use your PT chart (or digital gauge display) to convert this pressure reading into a temperature. This is your Saturation Temperature (ST).
The Saturation Temperature tells you the boiling point of the refrigerant inside the coil right now. This is a critical baseline number.
Step 3: Calculate the Superheat Value
This is the easy part! Superheat is simply the difference between the temperature you measured with the clamp (Step 1) and the temperature you found using the pressure gauge and chart (Step 2).
Here is the simple formula:
Superheat = Suction Line Temperature (SLT) – Saturation Temperature (ST)
Example Calculation
Let’s look at an example to make this super clear:
| Measurement | Value | Notes |
|---|---|---|
| Suction Line Temperature (SLT) | 45°F | Measured with the thermometer clamp. |
| Suction Pressure (R-410A) | 120 PSIG | Measured with the gauge set. |
| Saturation Temperature (ST) | 40°F | Converted from 120 PSIG using the PT Chart. |
| Calculated Superheat | 5°F (45°F – 40°F) | The final diagnostic number. |
Step 4: Determine the Target Superheat (Why This Number Matters)
Knowing your current superheat (e.g., 5°F) is only half the battle. You need to know what the AC manufacturer wants that number to be—this is called the Target Superheat.
Target Superheat isn’t a fixed number. It changes based on the air temperature outside and the air temperature inside your home (specifically the wet bulb temperature of the return air). This is how the system fine-tunes itself.
Since this can get complicated, here is a general, beginner-friendly guideline for a typical residential AC unit using R-410A or R-22 refrigerant when conditions are moderate (75–85°F outside):
General Superheat Target Ranges
| Condition | Typical Target Superheat Range | What it Means |
|---|---|---|
| Normal Operation (Ideal) | 8°F to 15°F | The system is safely charged and running efficiently. |
| Too Low (Danger Zone) | Below 5°F | Risk of liquid refrigerant damaging the compressor. System is overcharged. |
| Too High (Inefficient) | Above 20°F | System is likely undercharged (low refrigerant) or has low airflow. Poor cooling. |
Important Note: For precise results, you should always consult the manufacturer’s charging chart for your specific unit, which will use the outdoor ambient temperature and indoor wet-bulb temperature to give you the exact target number.
For more detailed charging procedures and official charts, check out resources like Energy.gov’s HVAC guides.
Troubleshooting Based on Your Superheat Reading
Once you have your final superheat number, you can diagnose common problems. Remember, this number is a direct indicator of your refrigerant charge level.
- If Superheat is Too Low: Your system is likely overcharged with refrigerant. This is dangerous for the compressor. You need to recover some refrigerant.
- If Superheat is Too High: Your system is likely undercharged (the most common issue). It could also mean there is a restriction, or the indoor airflow is too low (check your air filter!).
- If Superheat is Ideal: Congratulations! Your refrigerant charge is correct. If the unit is still not cooling well, the issue lies elsewhere—like a dirty coil or a failing component.
Safety First: Adjusting refrigerant levels requires specific training and equipment. If your diagnosis indicates a low or high charge, it is best to call a certified HVAC technician. Handling refrigerants improperly is illegal and dangerous.
FAQ: Your Superheat and AC Questions Answered
1. Is Superheat the same as Subcooling?
Nope! Superheat measures the gas on the low-pressure side (suction line) to make sure it’s 100% gas before the compressor. Subcooling measures the liquid on the high-pressure side (liquid line) to make sure it’s 100% liquid before the expansion valve. They are two different, but equally important, measurements.
2. How often should I check my Superheat?
If your AC is cooling fine, you don’t need to check it yearly. It’s mainly used as a diagnostic tool. Check it whenever you suspect a cooling problem, after replacing a major component, or after having a technician add or recover refrigerant.
3. Can I fix a high Superheat reading myself?
You can check the easy things first! A very high superheat is often caused by low airflow. Change your dirty air filter! If that doesn’t fix it, the problem is likely a low refrigerant charge, which requires a professional to fix the leak and recharge the system.
4. What happens if I ignore high Superheat?
If superheat is high, the system is working harder than it needs to. Your AC will run longer, consume more energy, and won’t cool effectively. This speeds up wear and tear on the compressor and other components.
5. Why is a low Superheat so dangerous?
Low superheat means there is liquid refrigerant making it back to the compressor. Compressors are designed to compress gas, not liquid. Liquid is non-compressible, and trying to compress it leads to catastrophic mechanical failure—a very expensive repair!
Closing Thoughts from Jack
See? Measuring Superheat isn’t some black magic only technicians understand. It’s a logical, step-by-step process that gives you vital information about the health of your AC system.
By learning this simple diagnostic technique, you are empowering yourself to monitor your system, catch problems early, and talk confidently with technicians. Keeping your AC properly charged and running smoothly means lower bills and perfect indoor comfort.
Keep those filters clean, stay cool, and trust your gut when your AC isn’t acting right. You’ve got this!