
Setting up a portable air conditioner can be simple—even if you’ve never done it before. This guide walks beginners through every step, from choosing the right unit to installing the exhaust hose and fine-tuning settings for maximum efficiency. With clear instructions and practical tips, you’ll have your room cooled down fast without any headaches. No tools? No problem. Most setups take under 30 minutes.
Key Takeaways
- Choose the right size: Match the BTU rating to your room size (e.g., 8,000–10,000 BTUs for rooms up to 350 sq ft).
- Pick a smart location: Place your portable AC near a window for easy hose installation and avoid blocking airflow.
- Install the exhaust hose correctly: Ensure a tight seal at both ends to prevent warm air from re-entering the room.
- Use a window kit properly: Secure all parts of the window bracket to avoid leaks and maintain cooling efficiency.
- Maintain regularly: Clean filters monthly and empty the water tank weekly to keep performance high.
- Optimize energy use: Use timer settings and eco modes to reduce electricity bills while staying comfortable.
- Safety first: Keep the unit away from flammable materials and ensure proper ventilation during operation.
Quick Answers to Common Questions
Can I install a portable AC without a window?
Yes, but you’ll need an exhaust vent kit that goes through a wall or ceiling. Some models also support ductless operation using a special adapter.
How long does it take to set up a portable AC?
Most beginners can complete setup in 15–30 minutes with basic tools and clear instructions.
Do I need special tools to install a portable AC?
Usually no—most kits use snap-together parts or simple screws. A screwdriver may be needed occasionally.
Can I leave my portable AC running overnight?
Yes, as long as it’s properly ventilated and the filter is clean. Just ensure the water tank is emptied if it doesn’t auto-drain.
What if my portable AC isn’t cooling well?
Check the hose connections, clean the filter, and verify the window seal. Kinked hoses or dirty filters are common causes of poor performance.
📑 Table of Contents
- Portable Ac Setup Guide for Beginners: Your Step-by-Step Cooling Companion
- Why Choose a Portable Air Conditioner?
- Step 1: Choosing the Right Portable AC for Your Space
- Step 2: Gathering Your Tools and Supplies
- Step 3: Finding the Perfect Spot for Your Portable AC
- Step 4: Installing the Exhaust Hose
- Step 5: Setting Up the Window Kit
- Step 6: Powering On and Testing Your System
- Step 7: Maintaining Your Portable AC for Long-Term Performance
- Energy-Saving Tips for Beginners
- Final Thoughts: You’ve Got This!
Portable Ac Setup Guide for Beginners: Your Step-by-Step Cooling Companion
If you’ve ever felt that sweltering heat creeping into your home and thought, “There has to be an easier way than drilling holes or hiring an HVAC technician,” then a portable air conditioner might just be your new best friend. Unlike traditional window units or central air systems, portable ACs are designed for quick, flexible cooling—no permanent installation required.
But here’s the thing: even though portable air conditioners are built for convenience, many people still struggle with setup. Missteps like improper hose installation or placing the unit too far from a window can lead to weak cooling, higher energy bills, or even damage to the machine. That’s why we created this beginner-friendly portable AC setup guide. Whether you’re cooling a small bedroom, a rental apartment, or a home office, we’ll walk you through every step—so you can enjoy cool, comfortable air without the stress.
Why Choose a Portable Air Conditioner?
Visual guide about Portable Ac Setup Guide for Beginners
Image source: i.ytimg.com
Portable air conditioners offer unmatched flexibility. You can move them from room to room, use them seasonally, and install them almost anywhere—even in homes without existing ductwork or suitable windows. For renters, students, or anyone living in older buildings, they’re often the most practical cooling solution.
Plus, modern portable ACs come with features like remote controls, programmable timers, and energy-saving modes. Some models even include dehumidifiers and fans, giving you year-round climate control. And when it comes to installation? Forget about complex wiring or structural changes. With the right setup, your portable AC can be ready to go in under 30 minutes.
Step 1: Choosing the Right Portable AC for Your Space
Visual guide about Portable Ac Setup Guide for Beginners
Image source: i.ytimg.com
Before you even unbox your new unit, make sure you’ve got the right size. Too small, and it won’t cool effectively. Too large, and it’ll waste energy and money.
To determine the ideal BTU (British Thermal Unit) rating for your room:
- Up to 150 sq ft: 6,000–8,000 BTUs
- 150–350 sq ft: 8,000–10,000 BTUs
- 350–500 sq ft: 10,000–14,000 BTUs
- Over 500 sq ft: Consider multiple units or a whole-home system
Also, check if your model includes a built-in dehumidifier—this helps remove excess moisture, making the air feel cooler and more comfortable. For larger spaces or areas with high humidity, look into models like those featured in our Best Portable AC For Tropical Weather guide.
Tip: Look for Easy-Setup Features
Some portable ACs come with self-contained hoses and tool-free window kits. These are perfect for beginners. Check out our roundup of Best Portable AC With Easy Setup for top recommendations.
Step 2: Gathering Your Tools and Supplies

Visual guide about Portable Ac Setup Guide for Beginners
Image source: storables.com
You don’t need a toolkit full of gadgets—just a few basics will do:
- Your portable AC unit (obviously!)
- Window mounting kit (usually included)
- A measuring tape
- A screwdriver (if not electric)
- A level (optional but helpful)
- Towels or rags (for spills)
Most window kits come with adjustable brackets, foam seals, and plastic ducts. Make sure everything is accounted for before you start. If anything’s missing, contact the manufacturer—they’ll send replacements quickly.
Pro Tip:
Place a towel on the floor near the unit. Water may leak slightly during drainage, especially in humid conditions. Better safe than soaked!
Step 3: Finding the Perfect Spot for Your Portable AC
Location matters more than you think. The ideal spot should be:
- Near a window (within 4–6 feet)
- On a flat, stable surface
- Away from direct sunlight and heat sources
- With enough clearance around all sides for airflow
Avoid placing the unit in corners or against walls where air can’t circulate freely. Also, keep it at least 12 inches away from furniture, curtains, or anything flammable.
For renters or those in apartments, consider models designed specifically for small spaces, like those in our Best Portable AC For Small Apartments list.
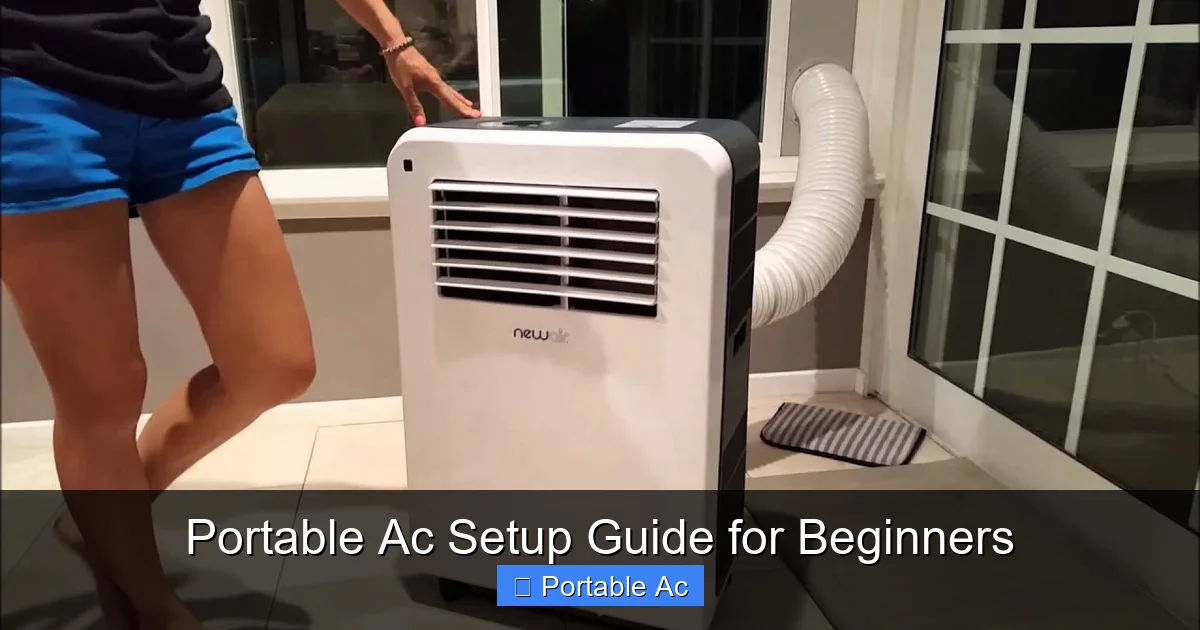
Step 4: Installing the Exhaust Hose
This is arguably the trickiest part—but don’t worry, it’s simpler than it looks. The exhaust hose vents hot air outside, so proper sealing is crucial.
Here’s how to do it right:
- Attach one end of the hose firmly to the back of the portable AC. Most units have a quick-connect fitting—just push it in until it clicks.
- Slide the other end into the window kit’s duct connector. Again, push until secure.
- Make sure there are no gaps between the hose and the unit or window bracket. A loose connection lets hot air sneak back in, reducing efficiency by up to 30%.
If you’re unsure about your installation, check out our detailed guide: How To Install Portable AC Hose Your Quick Easy Setup Guide. It includes diagrams and video tips!
Common Mistake:
Kinking or bending the hose too sharply. Keep it as straight as possible—curves reduce airflow and strain the compressor.
Step 5: Setting Up the Window Kit
The window kit keeps cold air inside and hot air outside. Here’s how to assemble and install it:
- Measure your window opening to ensure a snug fit.
- Assemble the plastic frame according to the manual (usually snap-together).
- Insert foam weather stripping along the edges for a tight seal.
- Attach the frame to the window using screws or clamps.
- Secure the exhaust hose to the duct outlet on the kit.
For sliding or casement windows, some kits include adapters. If yours doesn’t, you may need to purchase one separately. Always follow the manufacturer’s instructions—different brands vary slightly.
Quick Fix:
If the window kit feels flimsy, add extra foam tape or cardboard behind the frame to improve insulation.
Step 6: Powering On and Testing Your System
Once everything’s connected, plug the unit into a grounded outlet—never daisy-chain extension cords unless the manual says it’s safe. Then:
- Turn on the power.
- Set your desired temperature (start around 72°F for comfort).
- Switch to cooling mode.
- Wait 10–15 minutes for the system to stabilize.
You should feel cool air blowing within minutes. If not, double-check hose connections and ensure the window seal is tight.
First-Time User Tip:
Run the unit for 30 minutes before adjusting settings. This helps the refrigerant cycle properly and prevents premature wear.
Step 7: Maintaining Your Portable AC for Long-Term Performance
Even the best setup won’t last forever without care. Regular maintenance keeps your portable AC running efficiently and extends its lifespan.
Here’s what to do weekly and monthly:
- Weekly: Empty the water tank (if applicable) and wipe down the exterior.
- Monthly: Remove and clean the air filter with mild soap and water. Let it dry completely before reinstalling.
- Every 3–6 months: Inspect the exhaust hose for cracks or blockages.
- Annually: Schedule a professional inspection if your model requires it.
A clogged filter reduces airflow and increases energy use by up to 15%. So yes—cleaning pays off in savings and comfort.
Bonus:
Use a vacuum attachment to blow dust out of hard-to-reach areas. Dry filters work better than wet ones, anyway!
Energy-Saving Tips for Beginners
Want to stay cool without skyrocketing your electricity bill? Try these tricks:
- Use the timer function to run the AC only when needed.
- Keep doors closed to prevent cooled air from escaping.
- Raise the thermostat by 2–3 degrees when you’re away.
- Close curtains or blinds during the hottest part of the day.
These small changes can cut energy costs by 10–20%. Plus, they help your portable AC work smarter, not harder.
Final Thoughts: You’ve Got This!
Setting up a portable air conditioner doesn’t have to be intimidating. With the right preparation, a little patience, and this step-by-step guide, even first-time users can achieve powerful, reliable cooling in under an hour. Remember: the key is proper hose installation, a secure window seal, and regular maintenance.
Whether you’re beating summer heat waves, cooling your home office, or just creating a cozy retreat in your living room, your portable AC is now ready to deliver comfort exactly where you need it.
And if you’re still shopping for the perfect unit, we’ve got you covered. Explore our curated lists like Best Affordable Portable AC For Home or Best Portable AC For First Time Buyers to find models that match your needs, budget, and lifestyle.
Stay cool, stay comfortable, and enjoy the freedom that comes with portable air conditioning!
Frequently Asked Questions
Can I use a portable AC in a room without a window?
It’s possible with a through-the-wall vent kit, but not recommended for long-term use. Without proper exhaust, the unit will overheat and shut off.
How often should I clean the filter?
Clean the filter every 1–2 weeks during heavy use. In dusty environments, do it weekly to maintain airflow and efficiency.
Is it safe to run a portable AC on carpet?
Yes, but place a hard surface or mat underneath to prevent dust from being pulled into the intake and reduce strain on the fan.
Can I connect multiple portable ACs in one room?
Not effectively. Multiple units compete for space and airflow, leading to uneven cooling and higher energy use. One well-sized unit is better.
Do portable ACs remove humidity?
Yes, most models include built-in dehumidifiers that pull moisture from the air, improving comfort and preventing mold growth.
How far should the portable AC be from the window?
Keep it within 4–6 feet of the window to minimize hose length and maintain strong airflow. Longer hoses reduce efficiency.