
Quick Summary
Found a refrigerant leak in your AC? Don’t sweat it! Many small leaks can be sealed with DIY-friendly products, saving you a service call and keeping your cool.
Is your air conditioner not cooling like it used to? Are your energy bills going up, up, up? Sometimes, a hidden problem like a refrigerant leak is the culprit. It can sound scary, but I’m here to make understanding and even fixing it super simple. Think of me as your friendly neighborhood AC guy, ready to break down AC mysteries so you can stay comfy and save some cash. This guide will show you how to spot a leak and what easy steps you can take to seal it yourself.
Why Sealing an AC Refrigerant Leak is a Smart Move
Refrigerant is the magic stuff that makes your AC cool. It travels through your system, absorbing heat from your home and releasing it outside. When it leaks, your AC has to work much harder to do its job. This means less cool air for you and higher electricity bills. Plus, if the refrigerant level gets too low, it can damage your AC’s compressor, which is a really expensive part to replace.
Catching and fixing a refrigerant leak early is like giving your AC a little TLC. It helps your system run more efficiently, keeps you cooler, and can save you from bigger repair bills down the road. It’s a win-win!
Signs Your AC Might Have a Refrigerant Leak
How can you tell if your AC is losing refrigerant? Look out for these common clues:

- Weak Cooling: Your AC is running, but the air coming out isn’t very cold.
- Frozen Evaporator Coils: You might see ice forming on the indoor part of your AC.
- Hissing Sounds: Sometimes, a leak can sound like a gentle hiss coming from the AC unit.
- Bubbles or Foamy Refrigerant Lines: If you can see the refrigerant lines (usually outside), you might spot bubbles or a foamy substance.
- Higher Energy Bills: As mentioned, a struggling AC uses more power.
- Soft or Mushy Spots in Yard: For outdoor units, a leak can sometimes cause unusual wet spots or even dead grass around the unit.
Can I Really Seal an AC Refrigerant Leak Myself?
Yes, you absolutely can! For many small leaks, DIY sealant products are a fantastic option. These products are designed to flow with the refrigerant and automatically seal small holes in the coils or lines. It’s much simpler than you might think.
These sealants are a great first step, especially if you’re comfortable doing a little hands-on work. They can prevent the refrigerant from escaping and save you the cost of a professional service call for a minor issue.
What You’ll Need: Your AC Leak Sealing Toolkit
Gathering your supplies before you start makes the job go much smoother. Here’s what you’ll likely need:
- AC Leak Sealant: There are various types available. Look for one specifically designed for AC systems and follow the product instructions carefully. Some are a single-step application, while others might require a bit more.
- Gloves: Protect your hands from any potential chemicals or grime.
- Safety Glasses: It’s always good to protect your eyes.
- Rags or Paper Towels: For cleaning up any spills.
- Access to Your AC Unit’s Refrigerant Ports: You’ll need to know where to connect the sealant. Usually, there’s a low-pressure service port.
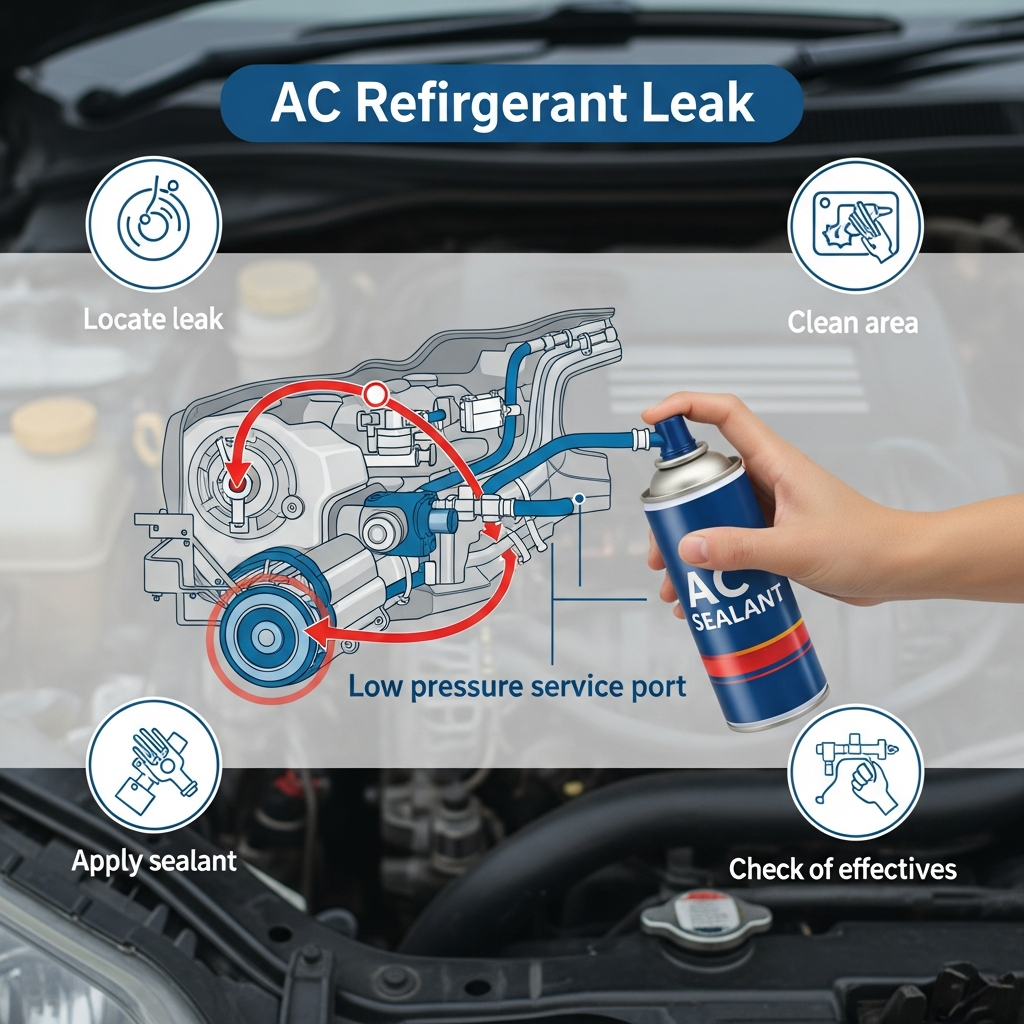
Step-by-Step: How to Seal Your AC Refrigerant Leak
Always remember to follow the specific instructions on your chosen leak sealant product. They are the ultimate guide! Here’s a general process:
- Turn Off Your AC: Safety first! Make sure your air conditioner is completely turned off at the thermostat and the breaker.
- Locate the Refrigerant Port: This is usually a small cap on the larger, insulated copper line connected to your outdoor unit. You’re looking for the low-pressure service port.
- Connect the Sealant: Carefully attach the sealant can or hose to the service port, following the product’s instructions. This might involve screwing on an adapter.
- Inject the Sealant: Once securely connected, follow the product’s directions to inject the sealant into the system. This might be as simple as opening a valve or pressing a button on the can.
- Disconnect and Reassemble: After the recommended amount of sealant is injected, carefully disconnect the sealant from the port. Replace any caps you removed.
- Turn Your AC Back On: Wait for the time recommended by the sealant manufacturer before turning your AC back on at the breaker and thermostat.
- Monitor Your AC: Keep an eye on your AC’s performance over the next few days. Is it cooling better? Are the strange noises gone?
If you’re unsure about locating the ports or performing these steps, it’s always best to consult your AC unit’s manual or call a professional. No shame in that!
When to Call a Professional AC Technician
While DIY sealants are great for small leaks, there are times when professional help is a must. If you notice any of these, it’s time to call in the experts:
- Large Leaks: If you hear loud hissing or your AC is completely out of cool air, the leak might be too big for a sealant.
- System Damage: If you suspect physical damage to the coils or lines, a professional can assess and repair it properly.
- Refrigerant Type: Some older systems use refrigerants that require special handling by certified technicians.
- Persistent Problems: If sealing the leak doesn’t solve your cooling issues, there might be another problem.
- Lack of Confidence: If you’re not comfortable with any part of the process, a technician is your best bet.
A professional has specialized tools to detect even tiny leaks and can recharge your system with the correct amount of refrigerant if needed. You can find certified HVAC professionals through resources like the ENERGY STAR website.
Understanding Refrigerant Types
Refrigerants have changed over the years for environmental reasons. Older ACs might use R-22 (Freon), which is being phased out. Newer units typically use R-410A. It’s important to use a sealant compatible with your AC’s specific refrigerant. Most modern DIY sealants are designed to work with common types like R-410A.
Knowing your refrigerant type is crucial. If you’re unsure, check your AC unit’s label or consult your owner’s manual. This information is vital for both DIY fixes and professional service.
Table: Common AC Symptoms and Possible Causes
| Symptom | Possible Cause | DIY Fix/Check |
|---|---|---|
| Weak Cooling | Refrigerant Leak, Dirty Filter, Dirty Coils | Check/Replace Filter, Visual Inspection for Leaks |
| AC Freezing Up | Low Refrigerant, Restricted Airflow (Dirty Filter) | Replace Filter, Check for Leaks |
| Strange Noises (Hissing) | Refrigerant Leak | Visual Inspection for Leaks, Consider Sealant |
| High Energy Bills | Refrigerant Leak, Dirty Coils, Unit Working Hard | Check for Leaks, Clean Coils (External), Replace Filter |
Frequently Asked Questions About AC Refrigerant Leaks
Q1: How much does it cost to fix a refrigerant leak?
A small DIY fix can cost just the price of a sealant kit, usually $20-$50. A professional might charge $100-$300 for a leak detection and sealant, plus refrigerant if needed. Major repairs can be much more.
Q2: Will sealing a leak harm my AC?
When used correctly according to the manufacturer’s instructions, most reputable AC leak sealants are safe for your system. Always choose products designed for HVAC use.
Q3: How long does a refrigerant leak sealant last?
Many sealants are designed to be permanent, sealing the leak and staying in the system. However, if the leak is large or the sealant fails, you might need professional help.
Q4: Can I just add more refrigerant if I have a leak?
No, you should never just “top off” refrigerant if you have a leak. Refrigerant is a closed system, and adding more without fixing the leak is not only wasteful but can also be harmful to your system and the environment. It’s best to seal the leak first.
Q5: Where can I buy AC leak sealant?
You can find AC leak sealant at most home improvement stores, auto parts stores (for car ACs, but some are universal), and online retailers like Amazon.
Q6: Is it dangerous to be around refrigerant?
Refrigerants are generally safe when contained within the AC system. However, inhaling large amounts of leaked refrigerant can be harmful. Always work in a well-ventilated area and wear protective gear.
Q7: How often should I check for AC leaks?
It’s a good idea to do a quick visual check of your outdoor unit for any obvious signs of leaks (like oily residue or damp spots) during your regular AC maintenance, like when you change the air filter.
Keep Your Cool, One Simple Step at a Time
See? Dealing with a refrigerant leak doesn’t have to be a big, scary ordeal. By understanding the signs and knowing that simple DIY solutions exist, you’re already ahead of the game. Taking these small steps to maintain your AC can lead to big savings and a much more comfortable home. Keep up with simple checks, and your AC will thank you by keeping you cool all season long. You’ve got this!